User Guide
Table of contents
- Introduction
- About
- Quick start
- Before you begin
- Features
- FAQ
- Future plans
- Glossary
- Commands summary
Introduction
What is Contactmation?
Contactmation is a powerful desktop-based project and task management solution that helps you efficiently and effectively manage many projects at once through the Command Line Interface (CLI).
Contactmation will be able to help you save all your project member details, keep track of each project, and delegate tasks to each project.
Who is Contactmation for?
Contactmation is for project managers and supervisors who want to maintain an organised view of their projects and streamline the management of their projects.
About
Purpose
This guide will elaborate on all the features available in Contactmation that will help make your experience of using Contactmation pain-free.
Examples with real-world applications are present to give you a clearer idea of how the features can be utilised.
User Guide Navigation
This guide is broken into different sections that will aid you in better understanding our application.
Refer to:
- The contactmation window guide for a guide on the application window.
- The basic feature section to get started on using the application.
- The advanced feature section for powerful tools that will help make your experience of using Contactmation much more streamlined and customisable.
- The glossary for explanations to the different terms used throughout this guide.
- The command summary for a quick overview on how to use all our features.
For a more detailed view of all the features present, please visit the table of contents.
Contactmation Window Guide
The following figure shows how our application would appear on your screen upon opening Contactmation. Each part of our application will be labelled as such:
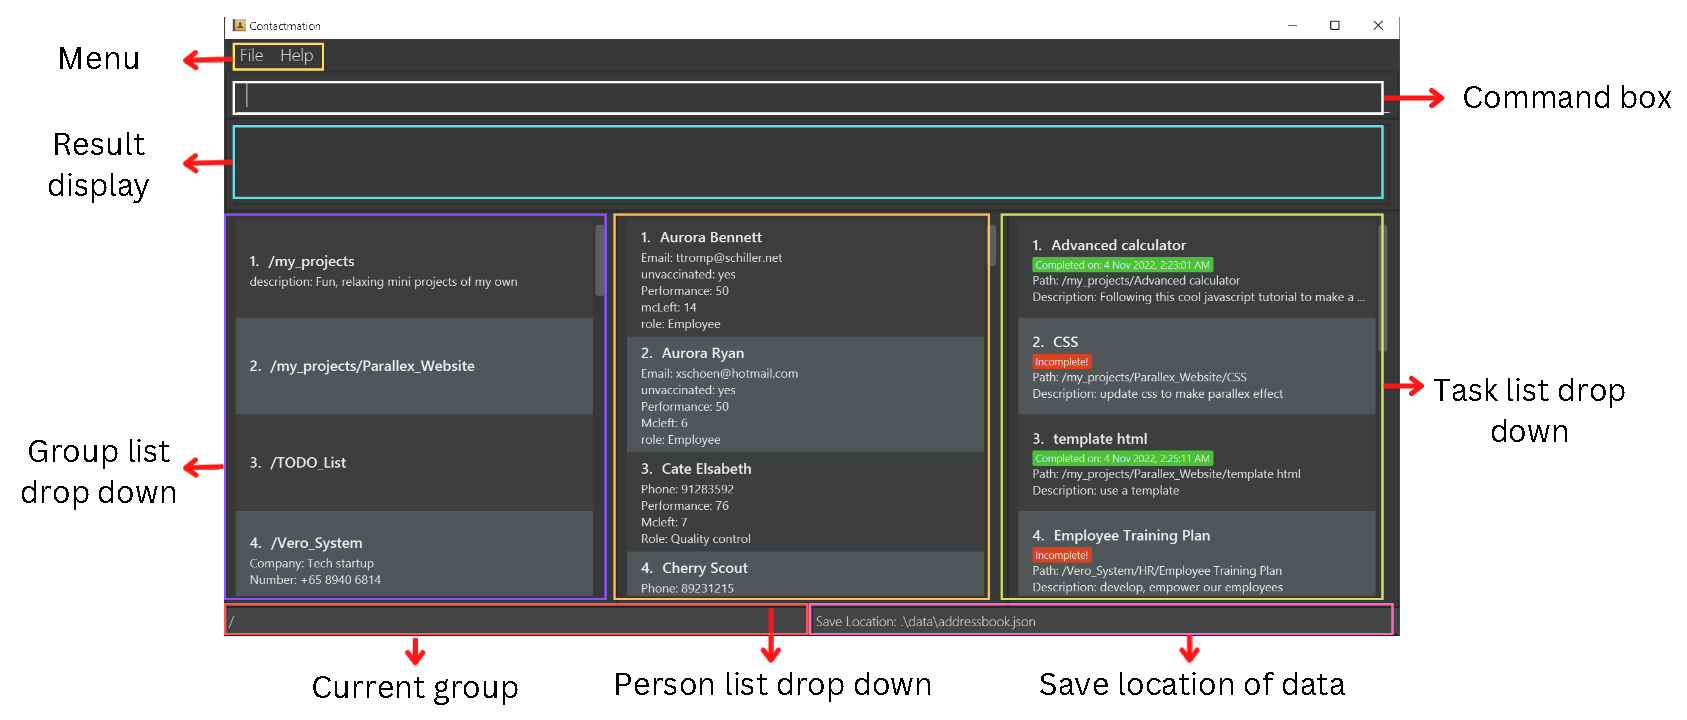
We will be referring to these terminologies throughout the user guide.
Prerequisites
Before you start up Contactmation on your computer,
-
Ensure that
Java version 11or above is installed on your device. Do refer to the FAQ if you need help with checking whetherJava 11is installed on your computer, or if you need help with installingJava 11. -
The current version of Contactmation can only be used in a desktop, but should work on all operating systems (such as Windows, macOS and Linux etc.) as long as
Java 11is installed.
Quick start
-
Ensure that the prerequisites are met before installing Contactmation.
-
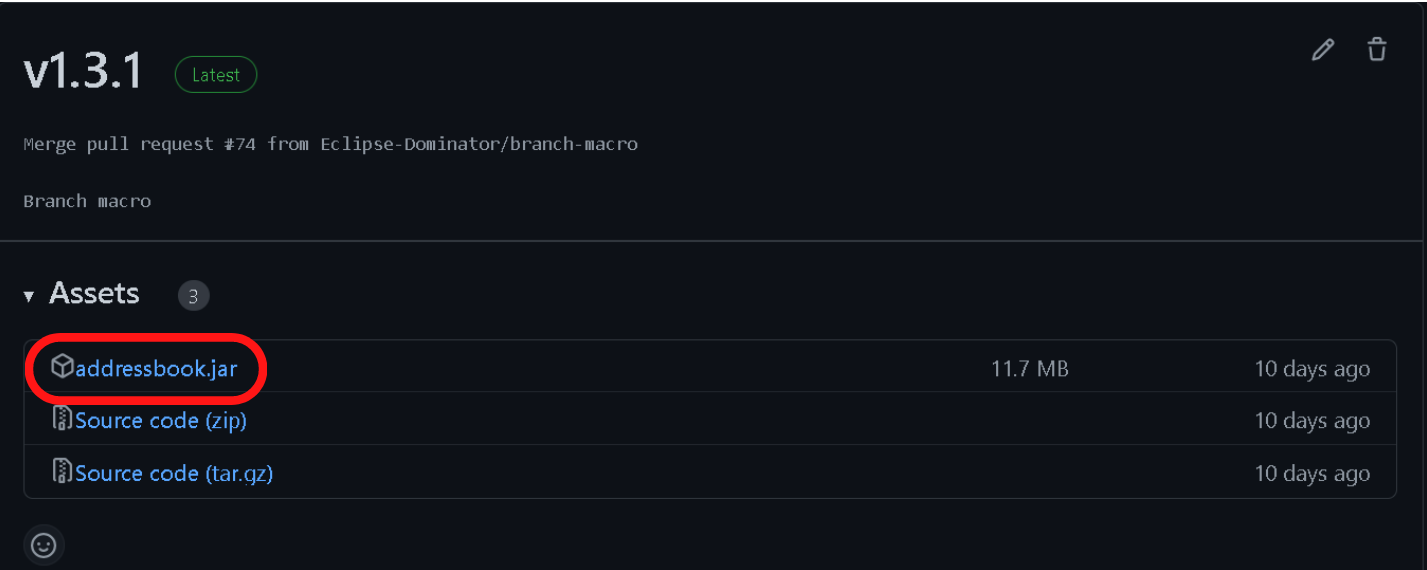
Download the latest version of
contactmation.jarfrom here. The filecontactmation.jarcan be found under theAssetsfor each version of Contactmation.
-
Save
contactmation.jarinto a Desktop folder on your computer. This folder will now be the home folder for Contactmation. Do look at the FAQ section for errors related to opening files used in Contactmation. -
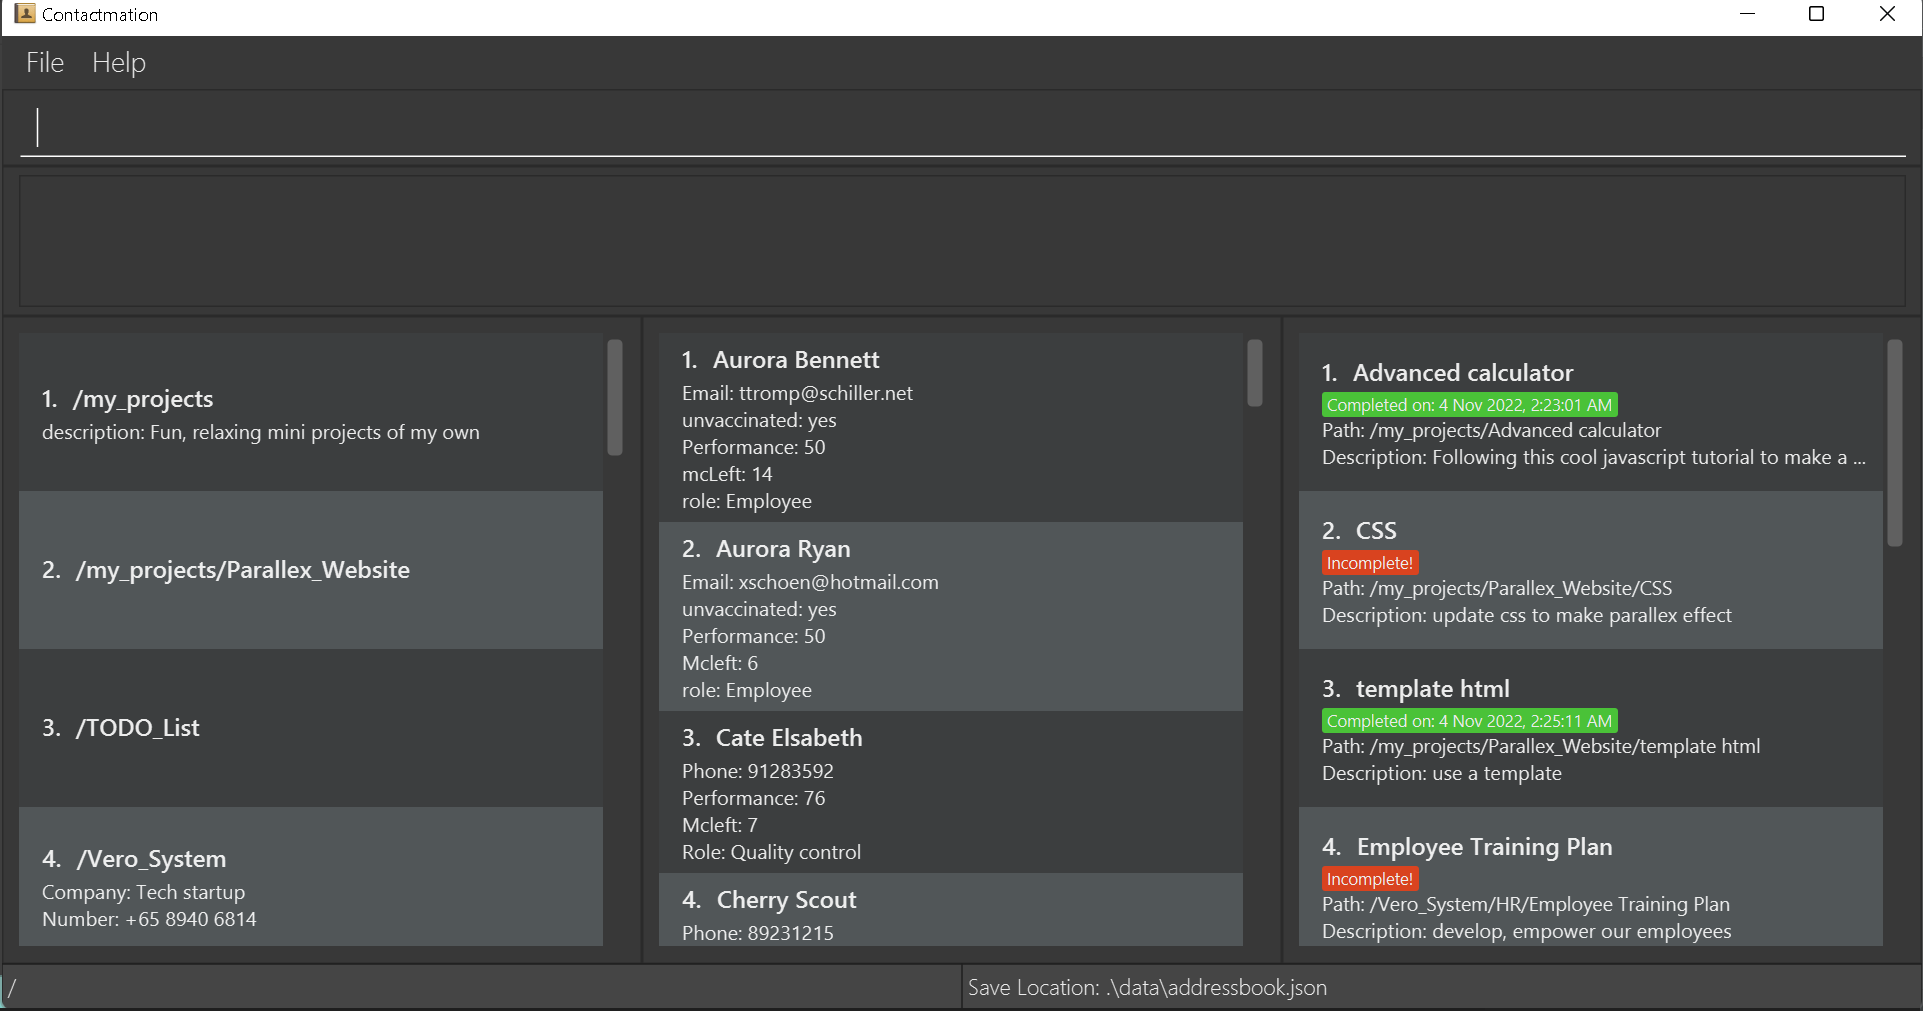
Double-click on
contactmation.jarto start up the application. You will be greeted with the current window if everything goes well:
-
You may begin by referring to the before you begin section to get started.
-
You may then move on to the basic features section to get started on using Contactmation. For additional, more powerful commands, refer to our advanced features, especially if you are comfortable with the CLI or have prior programming experience.
![]() Tip: If you wish to clear all default entries and begin with on a fresh slate, use the clear command.
Tip: If you wish to clear all default entries and begin with on a fresh slate, use the clear command.
Before you begin
Before you begin, you will need to know how to interact with Contactmation.
You may only interact with Contactmation by typing commands into the
command box. Upon hitting the Enter key, you will be able to execute the command
currently residing in the command box.
How do I clear the sample data in my newly downloaded version of Contactmation?
Simply type in the word clear into the command box and press the Enter key on your desktop. All the sample
data will be wiped. Do note that this action is irreversible.
How do I properly write these commands?
We will go through the standardised formats for each basic and advanced feature in their respective sections.
How do I read the standardised formats for each feature?
These formats may look cryptic at first glance. Do visit the Standardised Format Style section to better understand how to read the formats.
Standardised Format Style
This section aims to help you better understand the different terminologies used in the format section of each feature description.
| Format | Explanation |
|---|---|
| Square brackets ([ ]) | Anything that is within the square brackets are entirely optional. You may skip anything wrapped in the square bracket and move on to the next word in the command sequence. |
| Angled brackets (< >) | Anything within angled brackets are placeholder words. These words will be replaced by other words for the command to run. The replacing words will be specified in the format section for each feature. |
Ellipses (...) |
The word which these ellipses are attached to can be repeated multiple times in a single command. |
Combining the format styles
The innermost format in a word has the highest priority, while the outermost format in a word has a lower priority than any format within it. However, since an outer format is considered after the inner format, the outer format has a stronger connotation to it.
Here is an additional example to solidify your understanding of how these formats make sense when combined.
If the command format in the format section of a feature has [t/tags...], that means that the ellipses
will have a higher priority than the square brackets. This means that t/tags can be repeated multiple
times, but t/tags can be entirely optional as well. Therefore, it is possible to skip t/tags altogether, or have
1 or more t/tags in the command sequence.
Other keywords utilised in the guide are defined in the glossary.
Constraints on placeholder words
This section will help you understand what placeholder words in the format section for each command can be
replaced by. Placeholder words are words which are wrapped around angled brackets (<>) in the format section.
Do refer to the standardised format style section for more information to
understand the format styles for each command.
-
The
NAMEof the person or task must be alphanumeric and can contain white spaces. -
The
TEAM NAMEmust be alphanumeric. - The
PHONE_NUMBERis divided into 3 sections, namely the country code, area code and phone number in that order. Both the country and area code can have 1-4 digits, and the phone number can be 3 digits or more. All 3 sections must be separated by a white space. ThePHONE_NUMBERmay also begin with a (+) symbol. The country and area codes are entirely optional. -
The
EMAILof the person must have an@symbol. We will refer to anything before the@symbol asPART 1and anything after the symbol to bePART 2.-
PART 1: Can only contain alphanumeric characters and special characters such as (+\_.-). You may only start or endPART 1with alphanumeric characters. -
PART 2: Must have at least one period (.). We will refer to text separated by periods as domain labels.-
PART 2must end with a domain label at least 2 characters long. - Each domain label must start and end with alphanumeric characters.
- Each domain label can only consist of alphanumeric characters and hyphens.
-
-
-
The
ADDRESSof a person can take any values, but it should not be blank. -
The
TAGmust be alphanumeric. -
The
INDEXmust be a positive whole number which cannot exceed the number of groups, contacts or tasks currently displayed in the application window. -
The
KEYWORDandMORE_KEYWORDSmust be alphanumeric. -
The
TITLEis alphanumeric and can contain hyphens and underscores. -
The
DESCRIPTIONhas no restrictions. - The
ITEMcan only be replaced with eithertask,personorteam. -
The
SELECTED_ITEMare item that are selected via a select command or passed down from other commands See select command-
e.g.
-
task select 1will select the first task and that first task will be considered theSELECTED_ITEM
-
-
Making groups within groups
This section aims to help you understand the concept of creating groups under other groups.
What is “making groups within groups”?
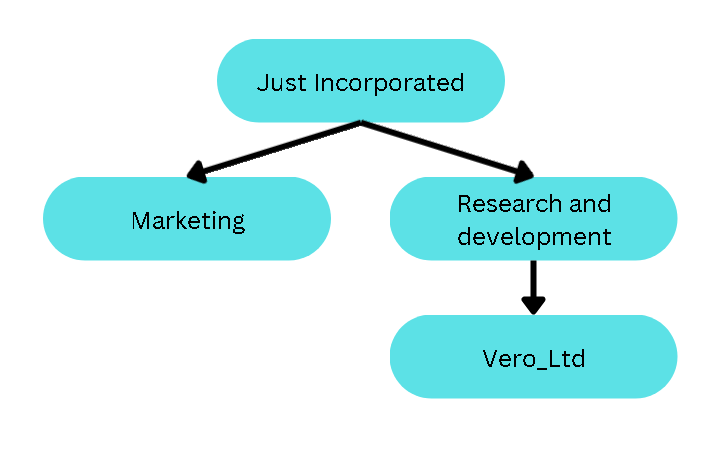
Here is a scenario. Let us say you are a boss of a company called Just_Incorporated, and you would like to track
the different departments in your company. Therefore, the departments in the company
(e.g. Marketing and Research_And_Development department) could act as groups within Contactmation.
However, let us also say that you are closely monitoring a particular group in the Research_And_Development
department, and let us call this group is Vero_Ltd. Then this group, Vero_Ltd, would
fall under the Research_And_Development group in Contactmation.
Here is how the grouping for this scenario would look like in theory:
This will be how the grouping looks like in Contactmation:
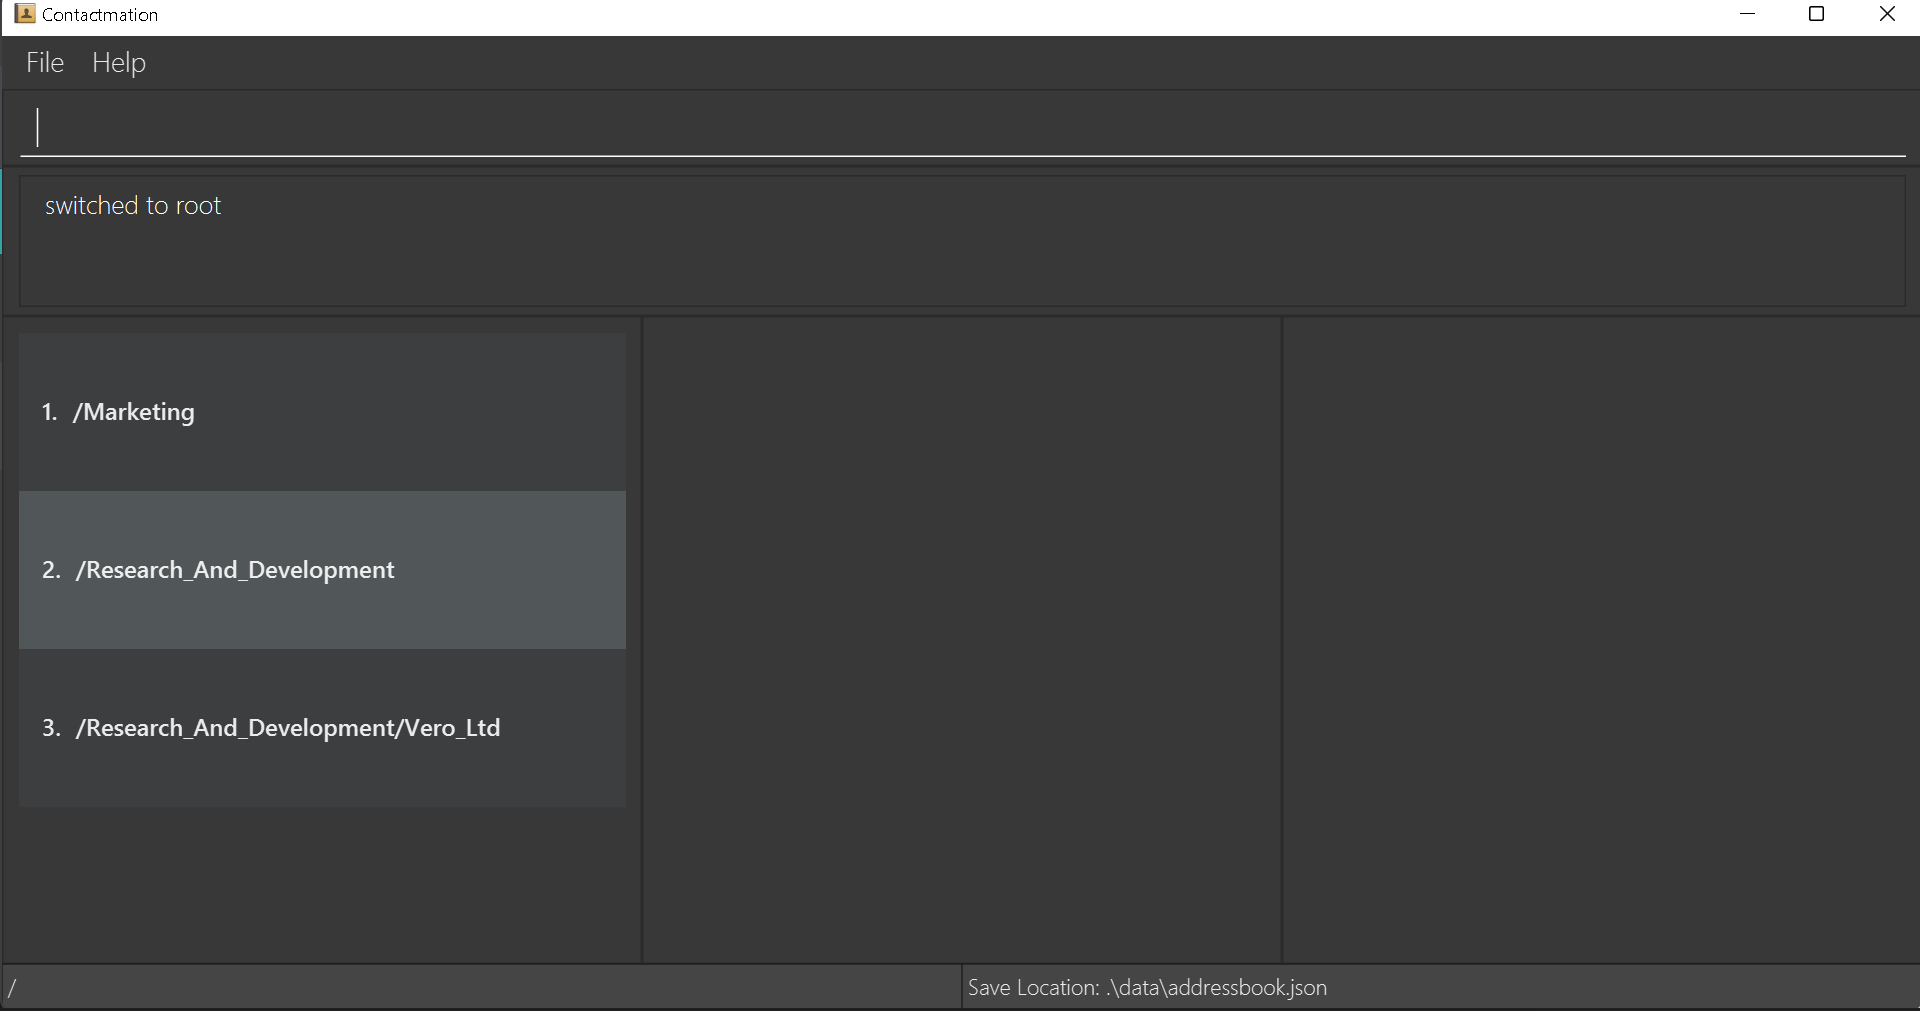
Note that Vero_Ltd is listed in group 3 as /Research_And_Development/Vero_Ltd.
This means that Vero_Ltd is within the group Research_And_Development, and this is shown with
the name of the group Vero_Ltd appearing after Research_And_Development followed by a slash (/)
separating the two names.
Now that you understand what it means to have a group inside another group, you might want to view specific information about a certain group and ignore other group information.
How do I restrict what I see on the display to only a specific group?
Let us say you are only interested in seeing everything related to the Research_And_Development department
and nothing else. In this case, you might want to restrict what you see on the Contactmation display
to only view information within Research_And_Development.
When you do this, all the other information in other groups (e.g. Marketing) will no longer
appear on your Contactmation display. Do not worry, all the other information is not lost. Information
about other groups are simply hidden from your view so that you can focus on Research_And_Development.
To “zoom into” a specific group, you can use the cg command.
![]() How to type the commands properly:
How to type the commands properly:
For more information on how to type the command, please visit the sections on standardised format styling and placeholder constraints that is used to type all commands.
![]() Tip: The cg command is also used to view all your other groups again. To do this, just type
Tip: The cg command is also used to view all your other groups again. To do this, just type cg .. or cg / into the command box.
Following the above example, cg 2 needs to be typed into the command box for you to view
Research_And_Development, since the Research_And_Development department is listed as group 2 in the
Contactmation display.
The following screen should appear upon pressing Enter:
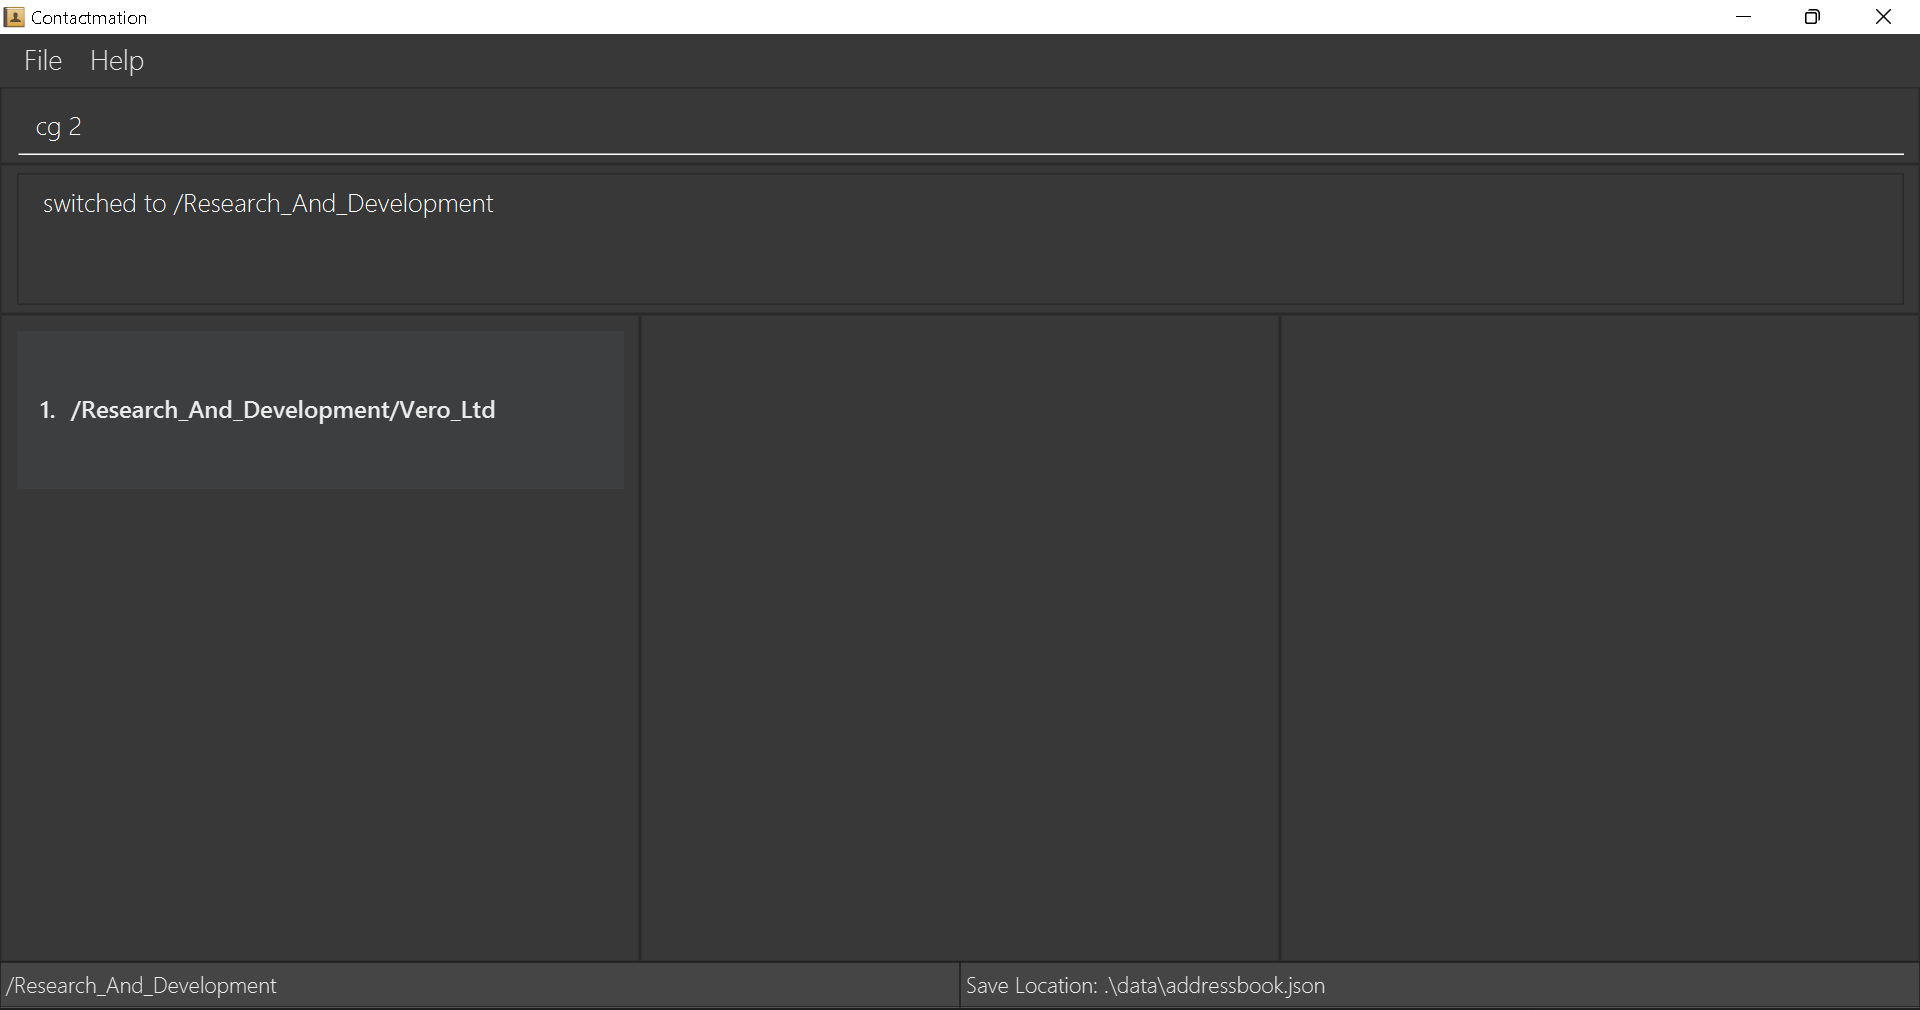
We can see that the Marketing and Research_And_Development departments can no longer be seen.
We are not able to see the Marketing department because now, we are focusing solely on the
Research_And_Development department.
What happened to the
Research_And_Developmentdepartment?
At the bottom left-hand corner of the application window, we can see the current group we are in.
Therefore, what we are seeing now is any groups, contacts or tasks that exist within Research_And_Development
only. Since Vero_Ltd is under the Research_And_Development group, it still can be seen on the display.
How do I create a group within another group?
Let’s assume you want to create another group, Kong_Pte_Ltd, under the Vero_Ltd group.
So, you will have to use the cg command to first “zoom in” to Vero_Ltd and restrict what you are seeing
on the display. So we will need to type cg 1 in the command box and execute the
statement.
Now, you are within the Vero_Ltd group. You may now create a subgroup within Vero_Ltd by executing the
team new command. In this case, you can type team new Kong_Pte_Ltd to create Kong_Pte_Ltd
within Vero_Ltd:
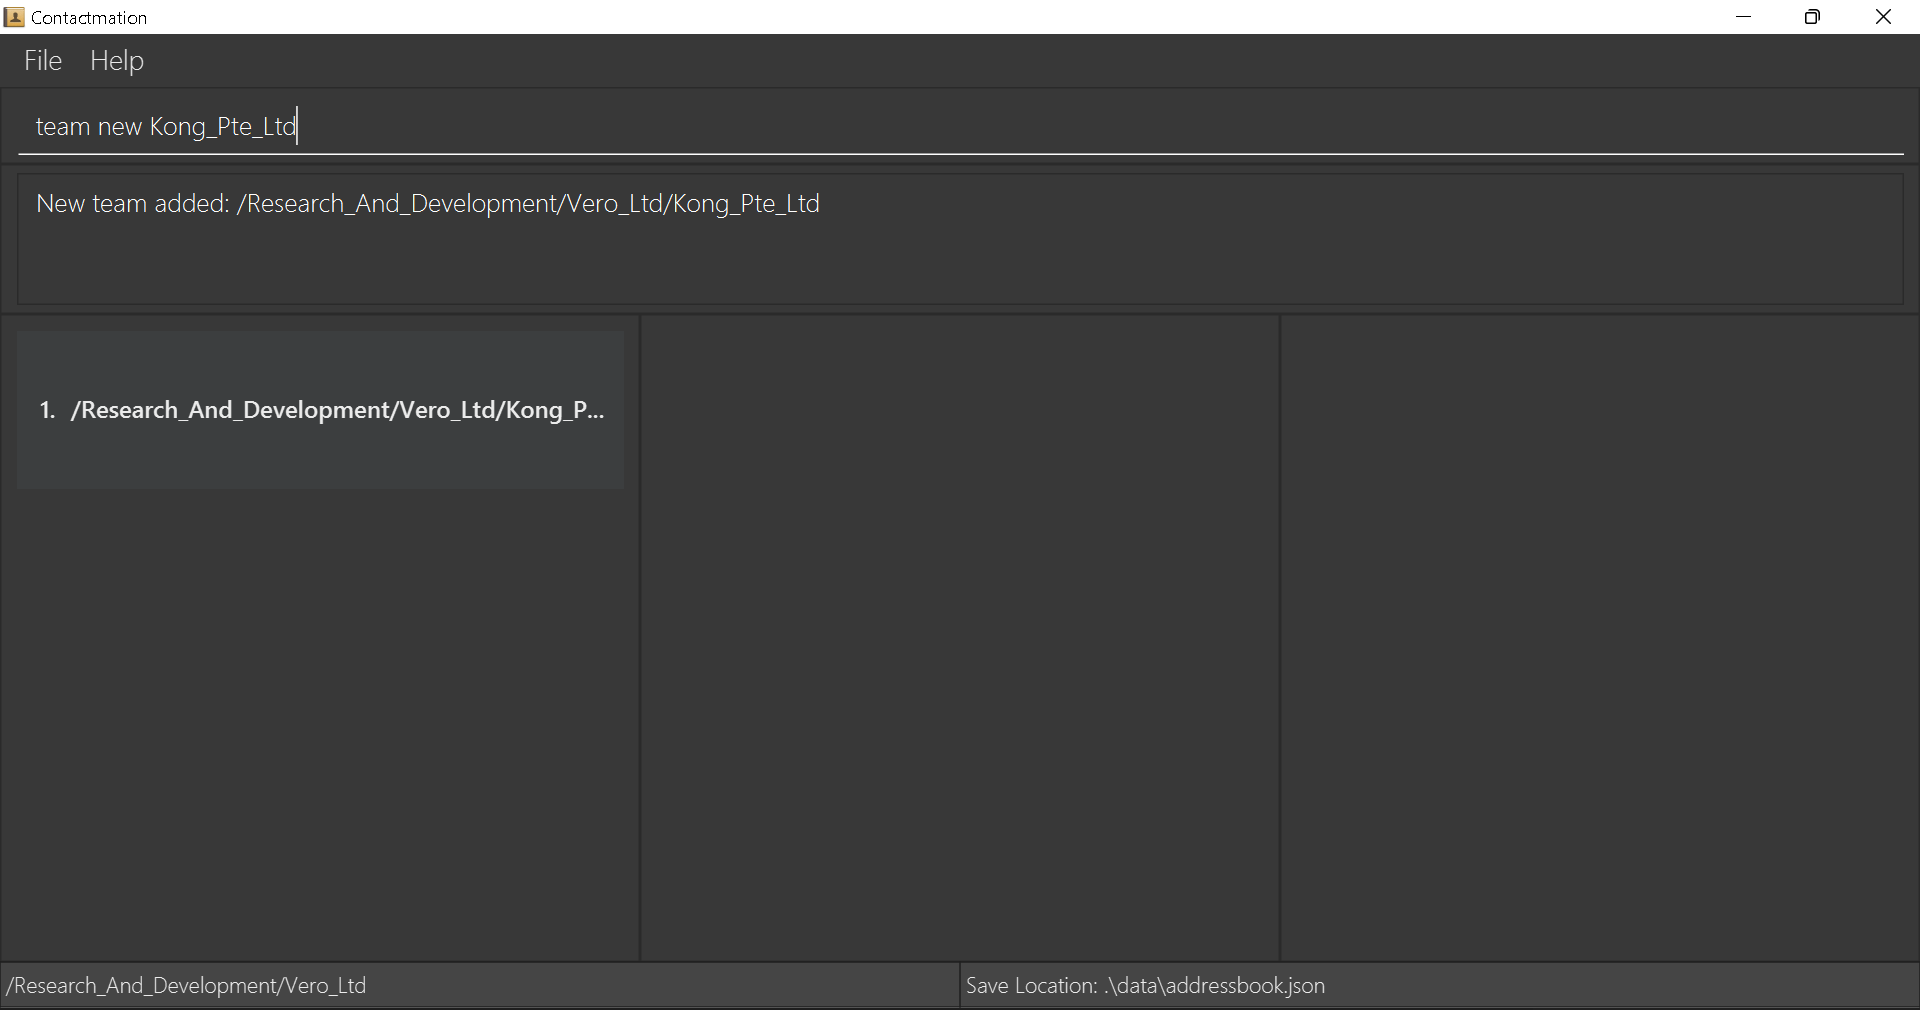
The Kong_Pte_Ltd group is now created within Vero_Ltd!
Features
With Contactmation, you can not only use the basic features to manage your group project, but also use advanced features to customise and streamline your experience in Contactmation.
However, if you are a new user of Contactmation, we recommend sticking to just the basic features. The basic features are more than enough to provide for all your needs with respect to group, contact and task management, whereas the advanced features only help with increasing the efficiency of using the application on large numbers of groups, contacts and tasks.
Do visit the standardised format style and the format constraint sections before writing commands in Contactmation.
Basic features
Now that you have finished setting up Contactmation, let’s start performing basic commands with Contactmation. As Contactmation aims to help you manage your contacts, project groups and tasks, we will start off by performing a range of basic commands varying from adding a person to manipulating tasks and groups.
The basic features are categorised as the following:
1. General commands
These commands can be applied to any group, contact or task.
Clear command: clear
This command clears all group, contact and task entries from the application. You can write this command if you are, for example, leaving a company and deciding to wipe all data related to the company.
![]() Caution: This action is irreversible! Please make sure that you really want to
delete all your information before doing so.
Caution: This action is irreversible! Please make sure that you really want to
delete all your information before doing so.
Format: clear
Find command: find
This command allows you to search for a person, group or task that matches a given KEYWORD. Searches may also include MORE_KEYWORDS
to further narrow the search for a contact, subgroup or task within the current scope.
Format: <ITEM> find <KEYWORD> [<MORE_KEYWORDS>]
Examples:
-
person find John Doe
This command finds a person named John Doe -
task find task1 task2
This command finds tasks whose name matches task1 or task2 -
team find team1 team2
This command finds teams whose name matches team1 or team2
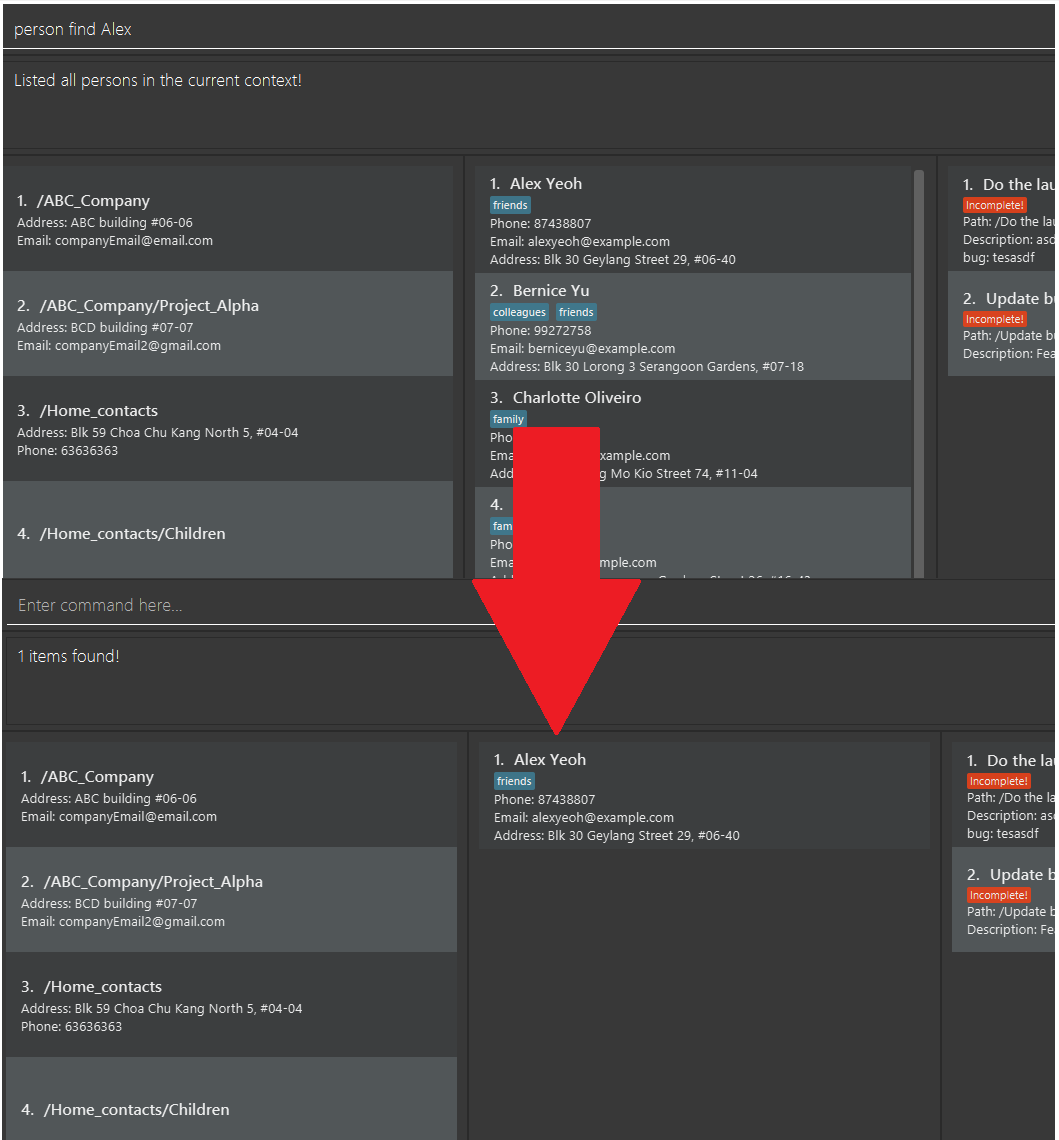
To reset the find filters, you can use the List command.
Listing all data in current team
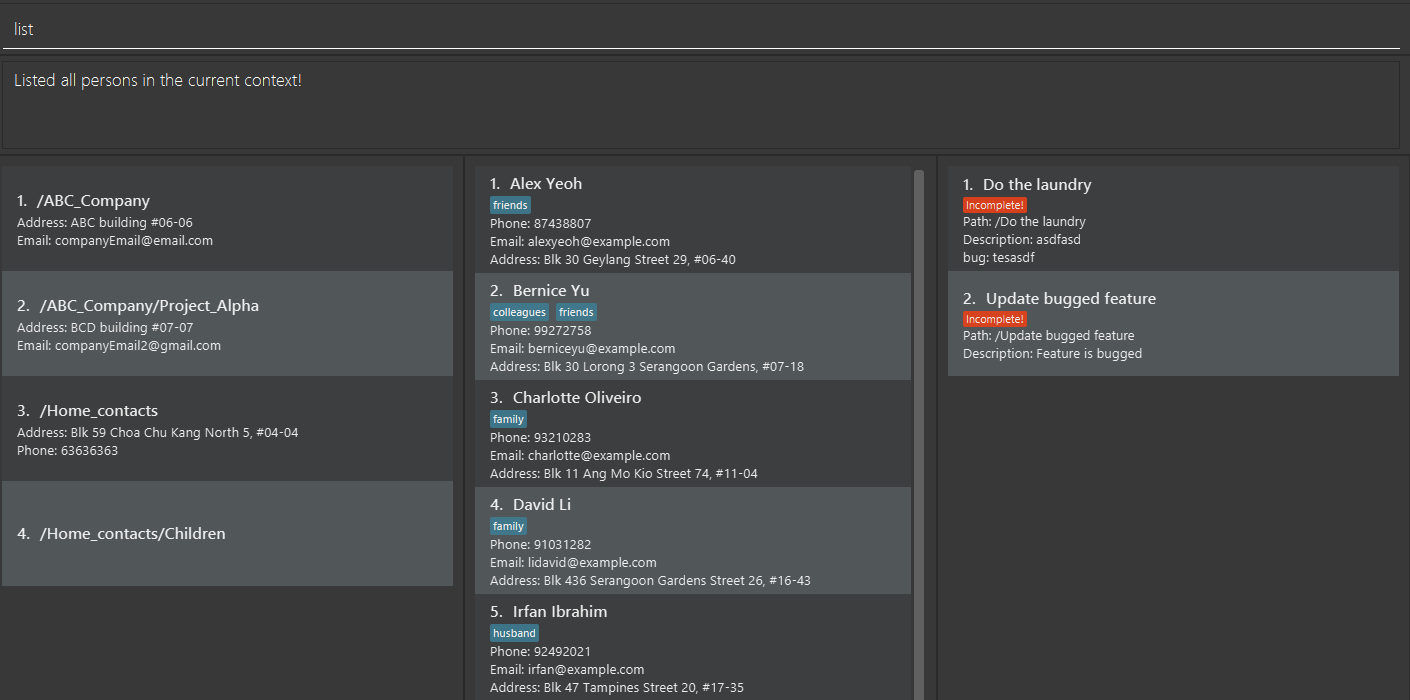
Contactmation supports the list command that displays all of your contacts in the current team to a list of persons.
To execute the command, ensure that you have navigated to the desired team, then execute the command list. If you
are currently not in the scope of any team, the list command will display all of your contacts in Contactmation by
default.
Format: list
Exits the program: exit
When this command is executed, the program will save all the groups, contacts and tasks present in Contactmation and closes the application.
Format: exit
Add a new field: field add
This command is for you to add additional information to a group, task, or person. This extra information will appear as text below the name of the group, task or person, as shown below:

Here, we can see that additional information that “Funding” is “On hold” in the group Research_and_development.
A field can provide additional information to the item when it is needed.
Format:
-
field add u/<INDEX> <FIELD NAME> <DESCRIPTION>to add a new field to the person at the currentINDEX. -
field add g/<INDEX> <FIELD NAME> <DESCRIPTION>to add a new field to the group at the currentINDEX. -
field add t/<INDEX> <FIELD NAME> <DESCRIPTION>to add a new field to the task at the currentINDEX. -
<SELECTED_ITEM> field add <FIELD NAME> <DESCRIPTION>to add a new field to the selected task/person/group. See select command
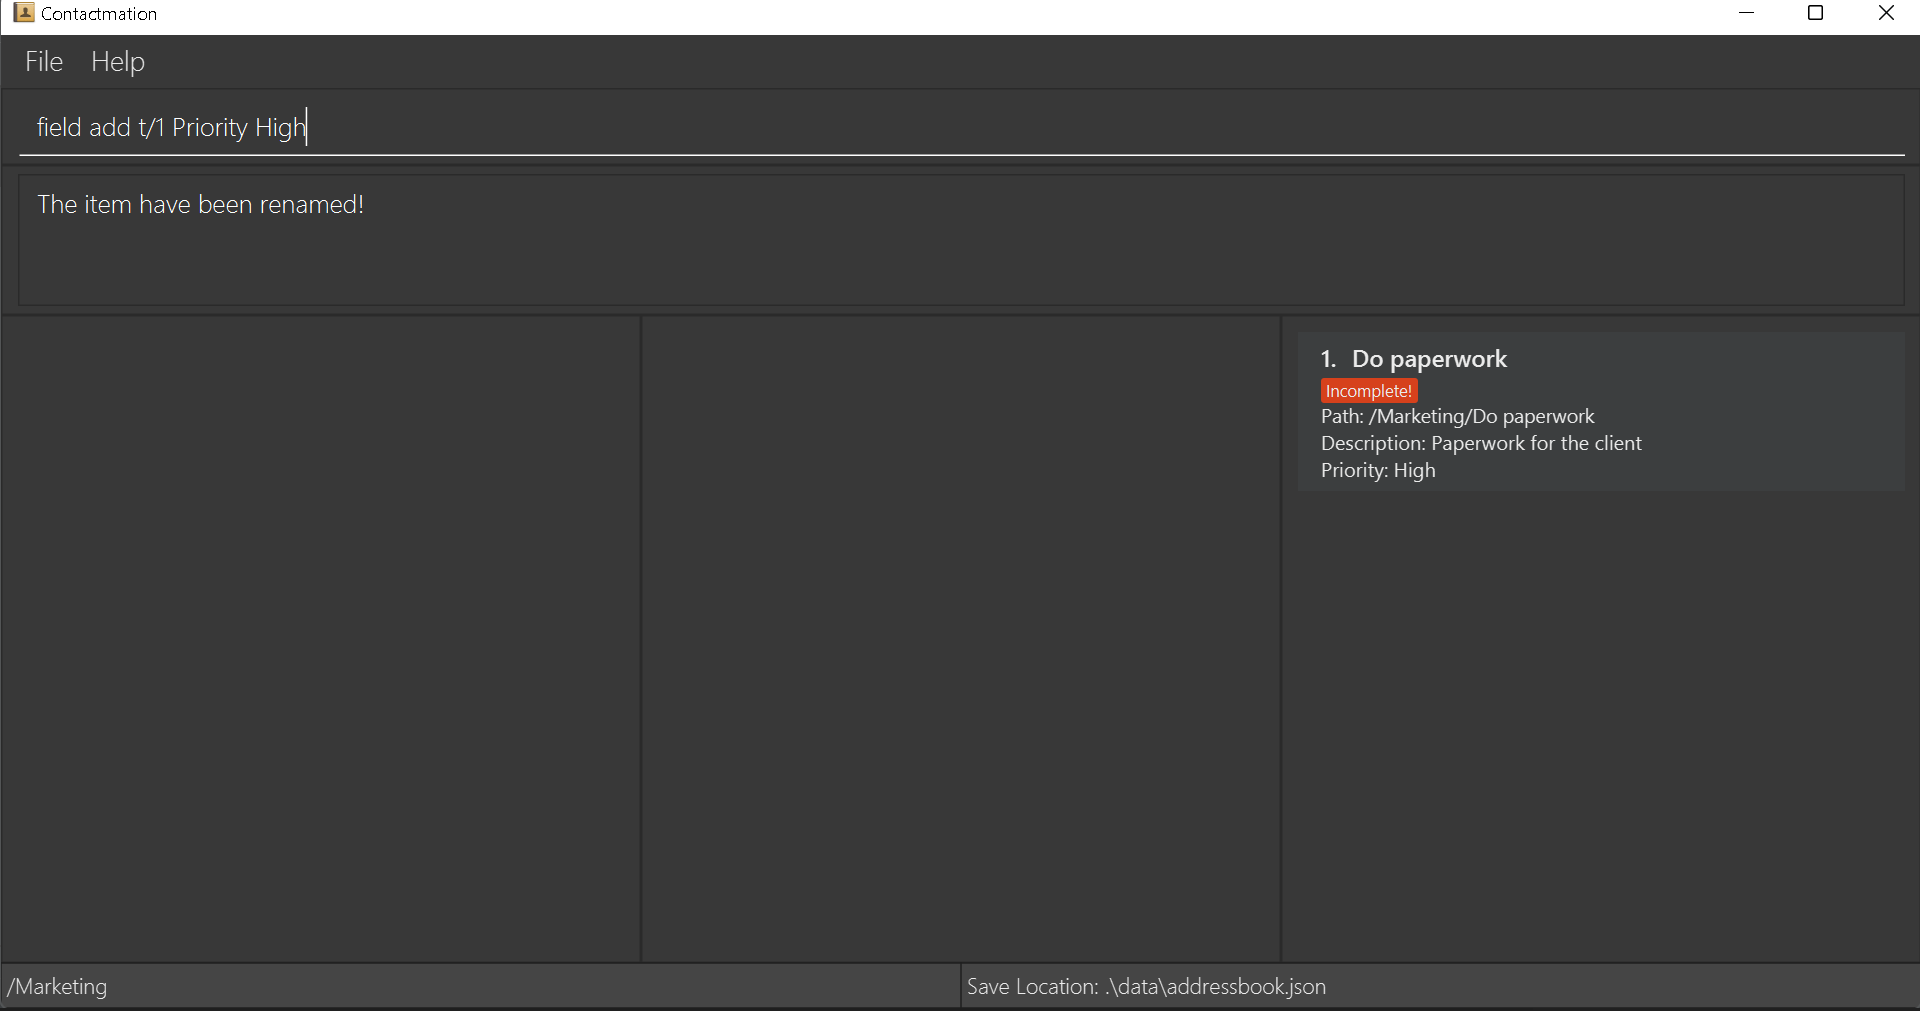
For example, let us say we have a task Do paperwork, and we want to add additional information to it. We can
call the command field add t/1 Priority High to add a field with the NAME as Priority and
the DESCRIPTION as High to the task with INDEX 1.
Edit a field: field edit
This command will attempt to edit an existing field that belongs to a group, task or person. It replaces the description of an existing field name to a new description.
Do visit the glossary for more details on what a field is.
However, if the field name does not exist, then the field should be added first through the field add command
explained above. Field names are case-sensitive.
Format:
-
field edit u/<INDEX> <FIELD NAME> <NEW DESCRIPTION>to edit the field namedFIELD NAMEto the person at the currentINDEX. -
field edit g/<INDEX> <FIELD NAME> <NEW DESCRIPTION>to edit the field namedFIELD NAMEto the group at the currentINDEX. -
field edit t/<INDEX> <FIELD NAME> <NEW DESCRIPTION>to edit the field namedFIELD NAMEto the task at the currentINDEX. -
<SELECTED_ITEM> <INDEX> field edit<FIELD NAME> <DESCRIPTION>to edit the field namedFIELD NAMEto the selected item. See select command
Here is an example. Let us say that we have a group, Research_and_development, that has
its “Funding” field to be “On hold”.

Let us now change “On hold” to “No longer on hold”, using the command field edit g/2 Funding No longer on hold.

The field is now successfully updated!
Delete a field: field delete
The command will attempt to delete a field that belongs to a group, task or person. A field can provide additional information to the item when it is needed.
Format:
-
field delete u/<INDEX> <FIELD NAME>to delete a field<FIELD NAME>from the person at the currentINDEX. -
field delete g/<INDEX> <FIELD NAME>to delete a field<FIELD NAME>from the group at the currentINDEX. -
field delete t/<INDEX> <FIELD NAME>to delete a field<FIELD NAME>from the task at the currentINDEX. -
<SELECTED_ITEM> field delete <FIELD NAME>to delete a field<FIELD NAME>from the task at the currentINDEX. See select command
Continuing from the example in add a new field, let us now
delete the Priority High field. To do this, we have to write field delete t/1 Priority
to delete the Priority field in the first task listed on the Contactmation display.
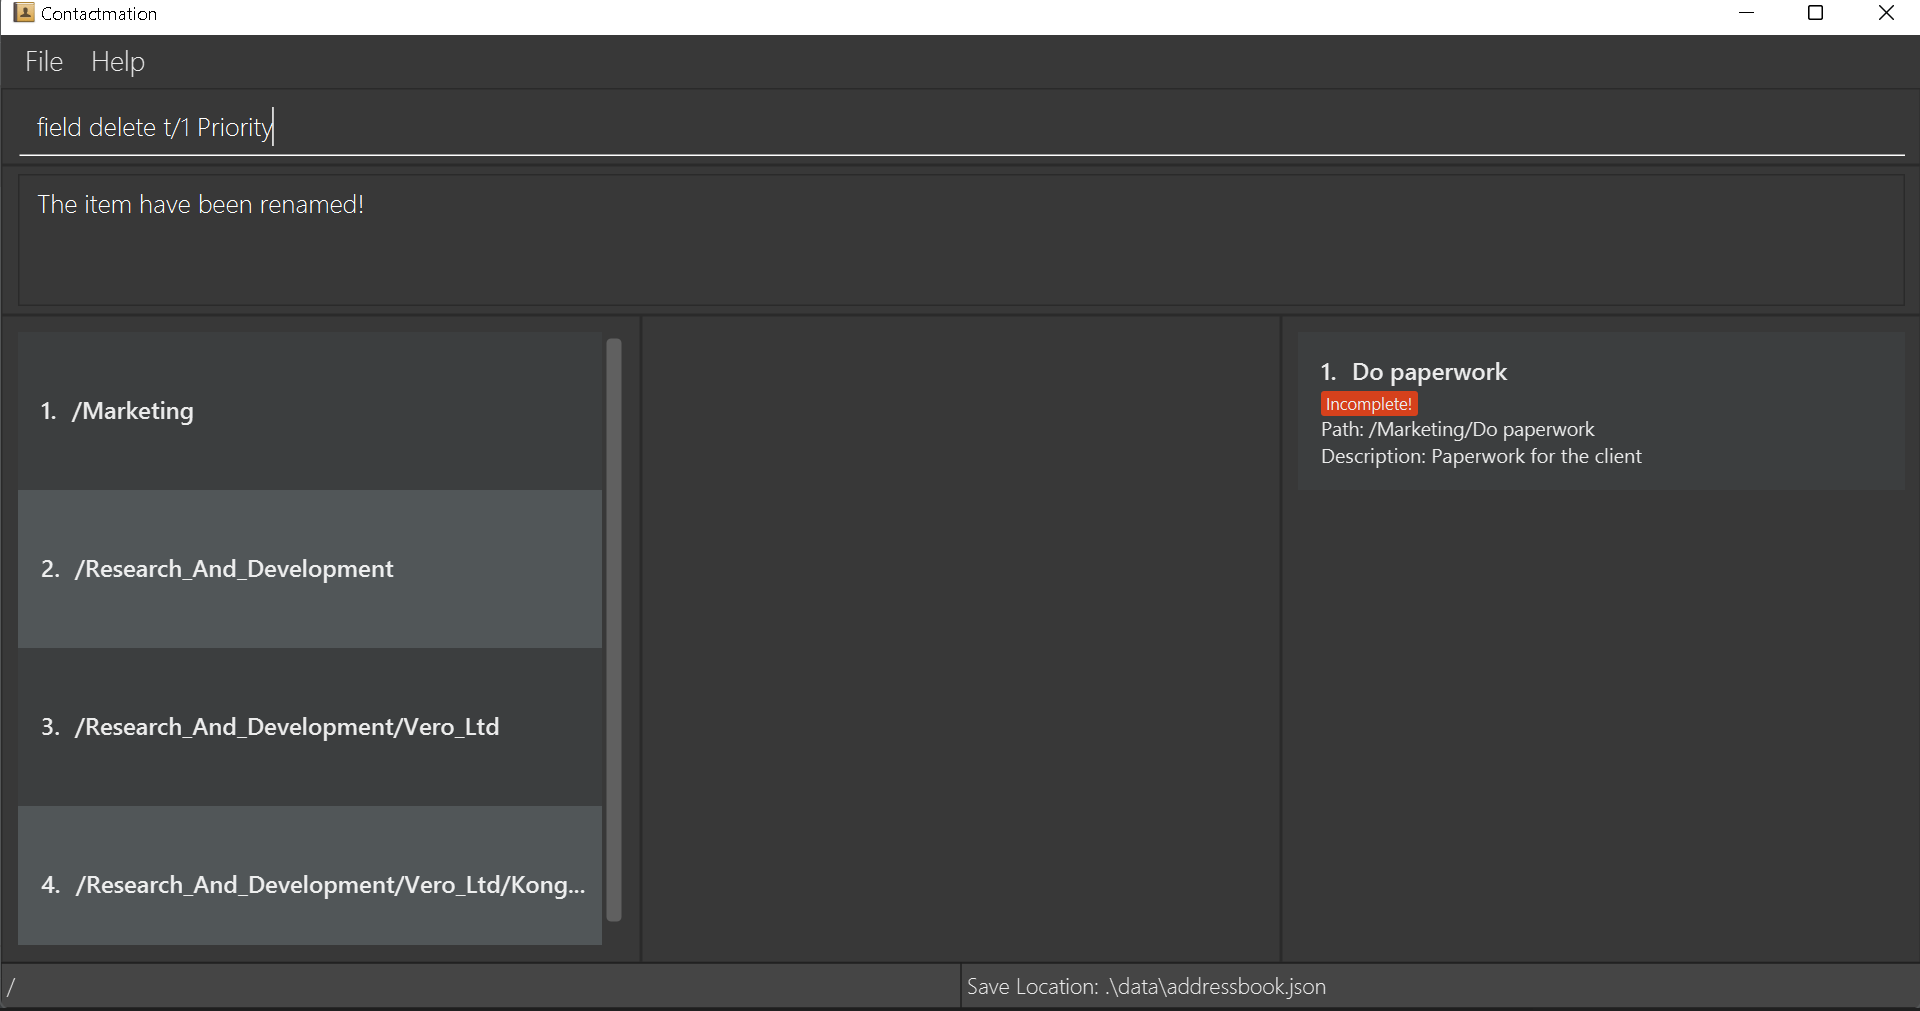
As we can see, the Priority High field is now deleted from the Do paperwork task.
Rename the name of items on the screen
If you want to rename any item in the app, this rename command is for you.
![]() Note:
Note:
In the following sections, <new name> here refers to the new name that you
want the group, contact or task to be renamed to.
Format:
-
rename g/<INDEX> <new name>to rename the group at the listedINDEX. -
rename u/<INDEX> <new name>to rename the contact at the listedINDEX. -
rename t/<INDEX> <new name>to rename the task at the listedINDEX. -
<SELECTED_ITEM> <INDEX> rename <new name>to rename the selected item. See select command
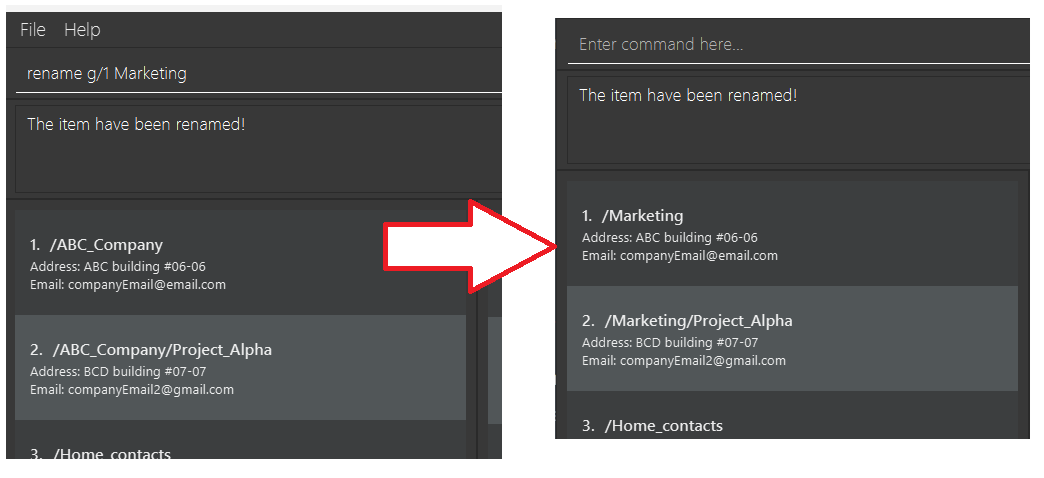
Example:
-
rename g/1 Marketing- this will rename the first group in your list to
Marketing.
- this will rename the first group in your list to
-
person select 1 rename JimmySee select command- this will rename the first user in your list to
Jimmy.
- this will rename the first user in your list to
Find command: find
Searches for a contact, group or task that matches the given KEYWORD. Searches may also include MORE_KEYWORDS
to further expand the search for a contact, subgroup or task within the current team.
Format: <ITEM> find <KEYWORD> [<MORE_KEYWORDS>]
Examples:
-
person find John Doe- This means that we will find all persons in the current team with the current
-
task find task1 task2
2. Team/Group commands
Contactmation allows you to group your contacts into teams. This section will showcase the different commands that can be used on groups.
Team-related commands in Contactmation begin with the team keyword.
Create a team: team new
This command helps you create a new group/team name in the current team.
![]() Note:
Note:
For more information on creating teams within teams, check this
section on what it really means to create teams within teams.
Format: team new <TEAM NAME>
The above command creates a new team with a specified team name. Do refer to the
constraints on placeholder words section for more information on what
you can type in TEAM NAME.
Examples:
-
team new Vongola_X -
team new vero-employees
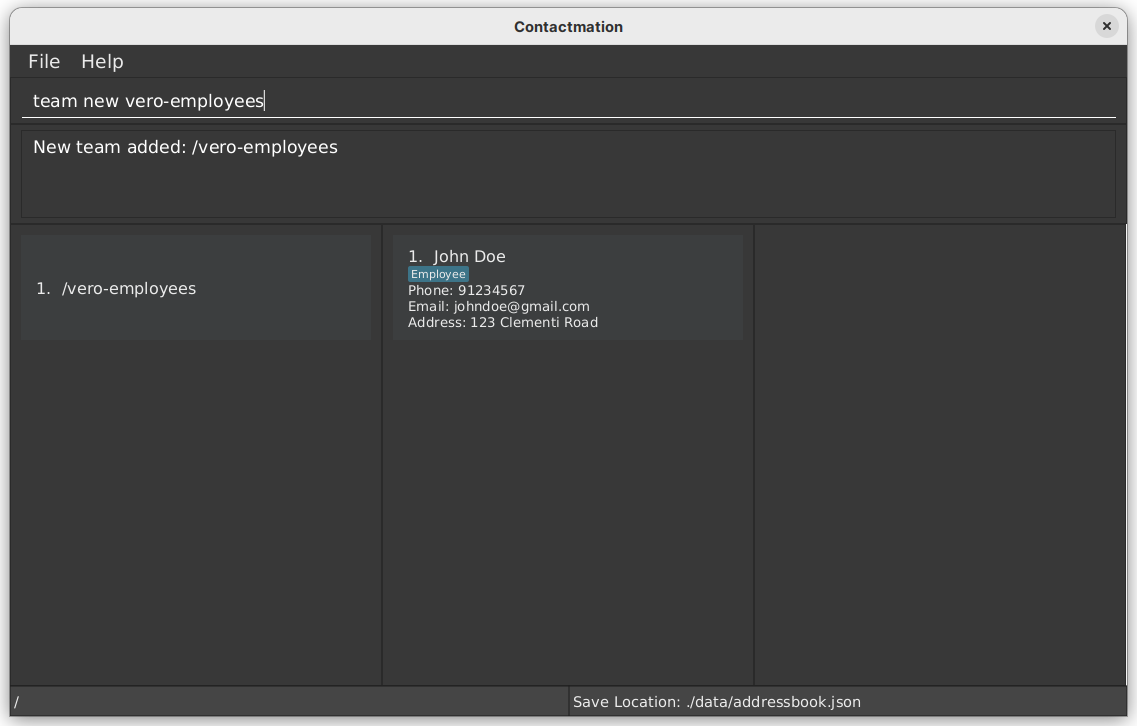
As seen in the example above, we are able to add team vero-employees to our
group list.
Delete a team: team delete
To delete a team from Contactmation, you can use the team delete command followed by the team number seen in
the current display of the team list.
Format:
team delete <INDEX>-
team select <INDEX> team deleteSee select command
Examples:
-
team delete 1- The above command deletes team number 1 in the team list.
What happens to all the people and tasks in that current team when I delete the team?
All persons and tasks will be transferred to the root group.
Navigate to a team: cg
To perform commands specific to a team, you will have to navigate first to that specific team. You can use the cg
command to navigate to a specified team.
![]() Tip: Please take a look at making groups within groups
for a tutorial on team navigation before executing this command.
Tip: Please take a look at making groups within groups
for a tutorial on team navigation before executing this command.
Formats:
cg <INDEX>-
team select <INDEX> cgSee select command -
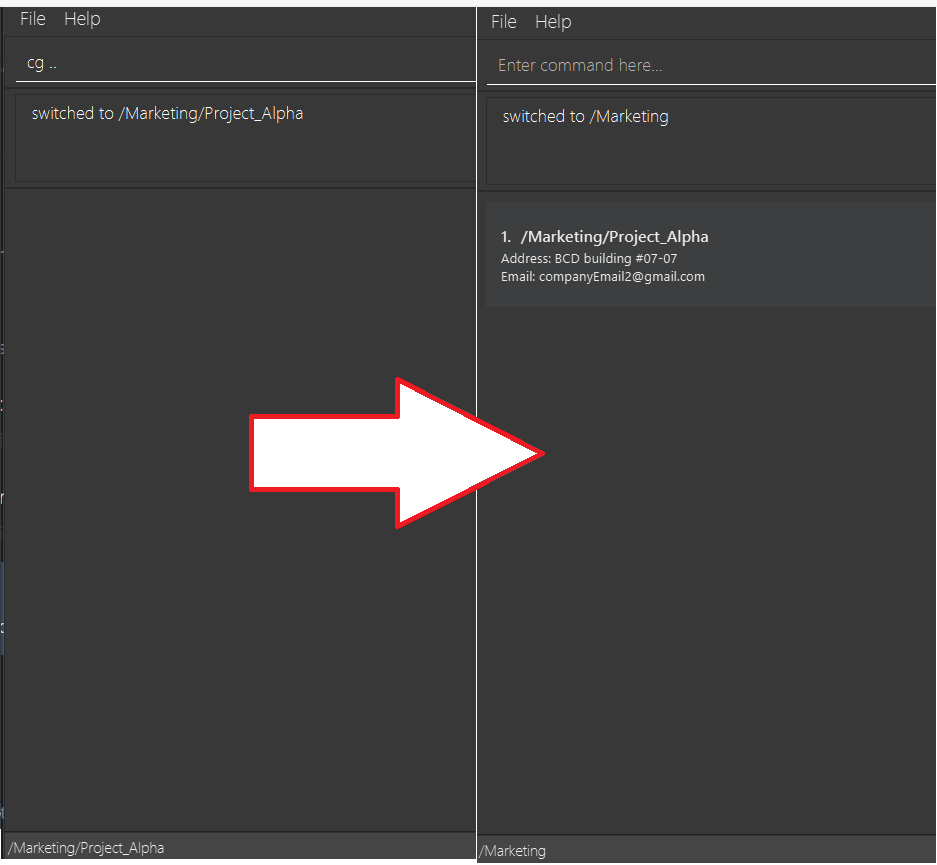
cg ..moves you out of the group and into the parent group. To better understand this, let us have the following example:
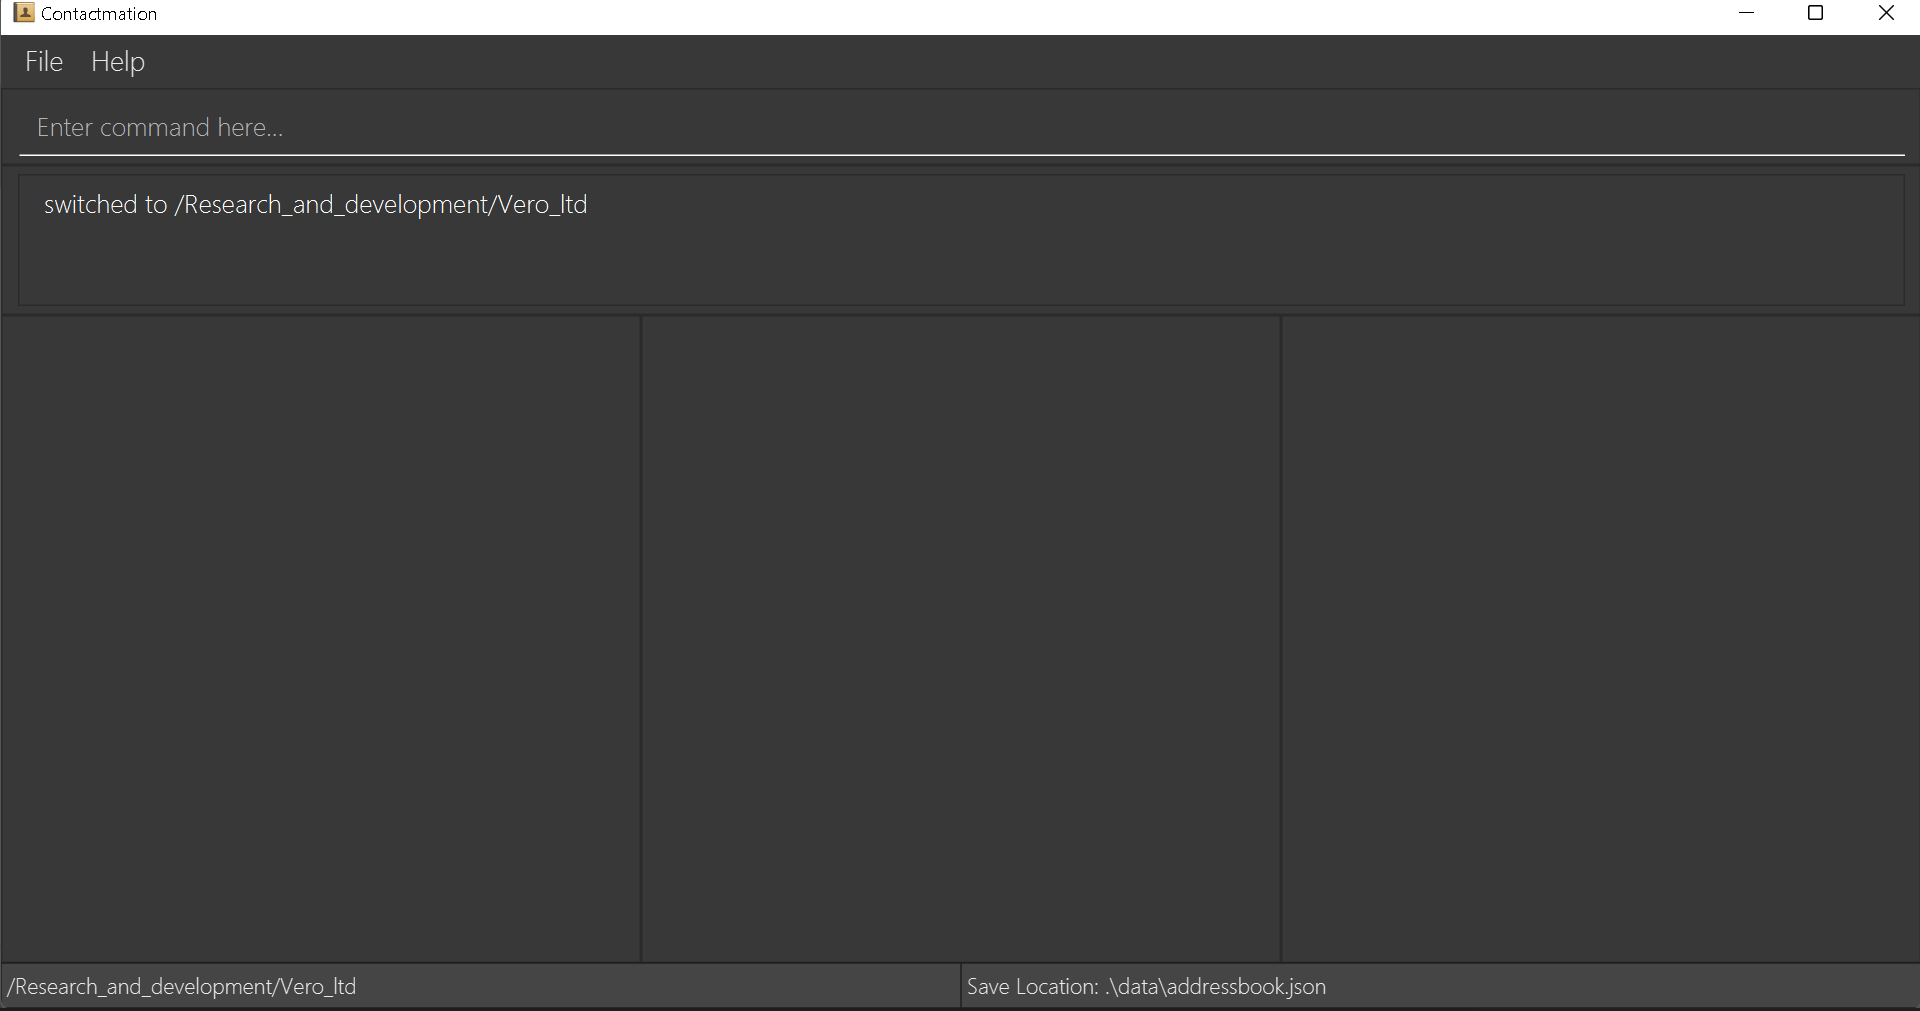
Here, we can see that we are in the group /Research_and_development/Vero_ltd.
However, when we use the cg .. command, we are able to move to the /Research_and_development group.
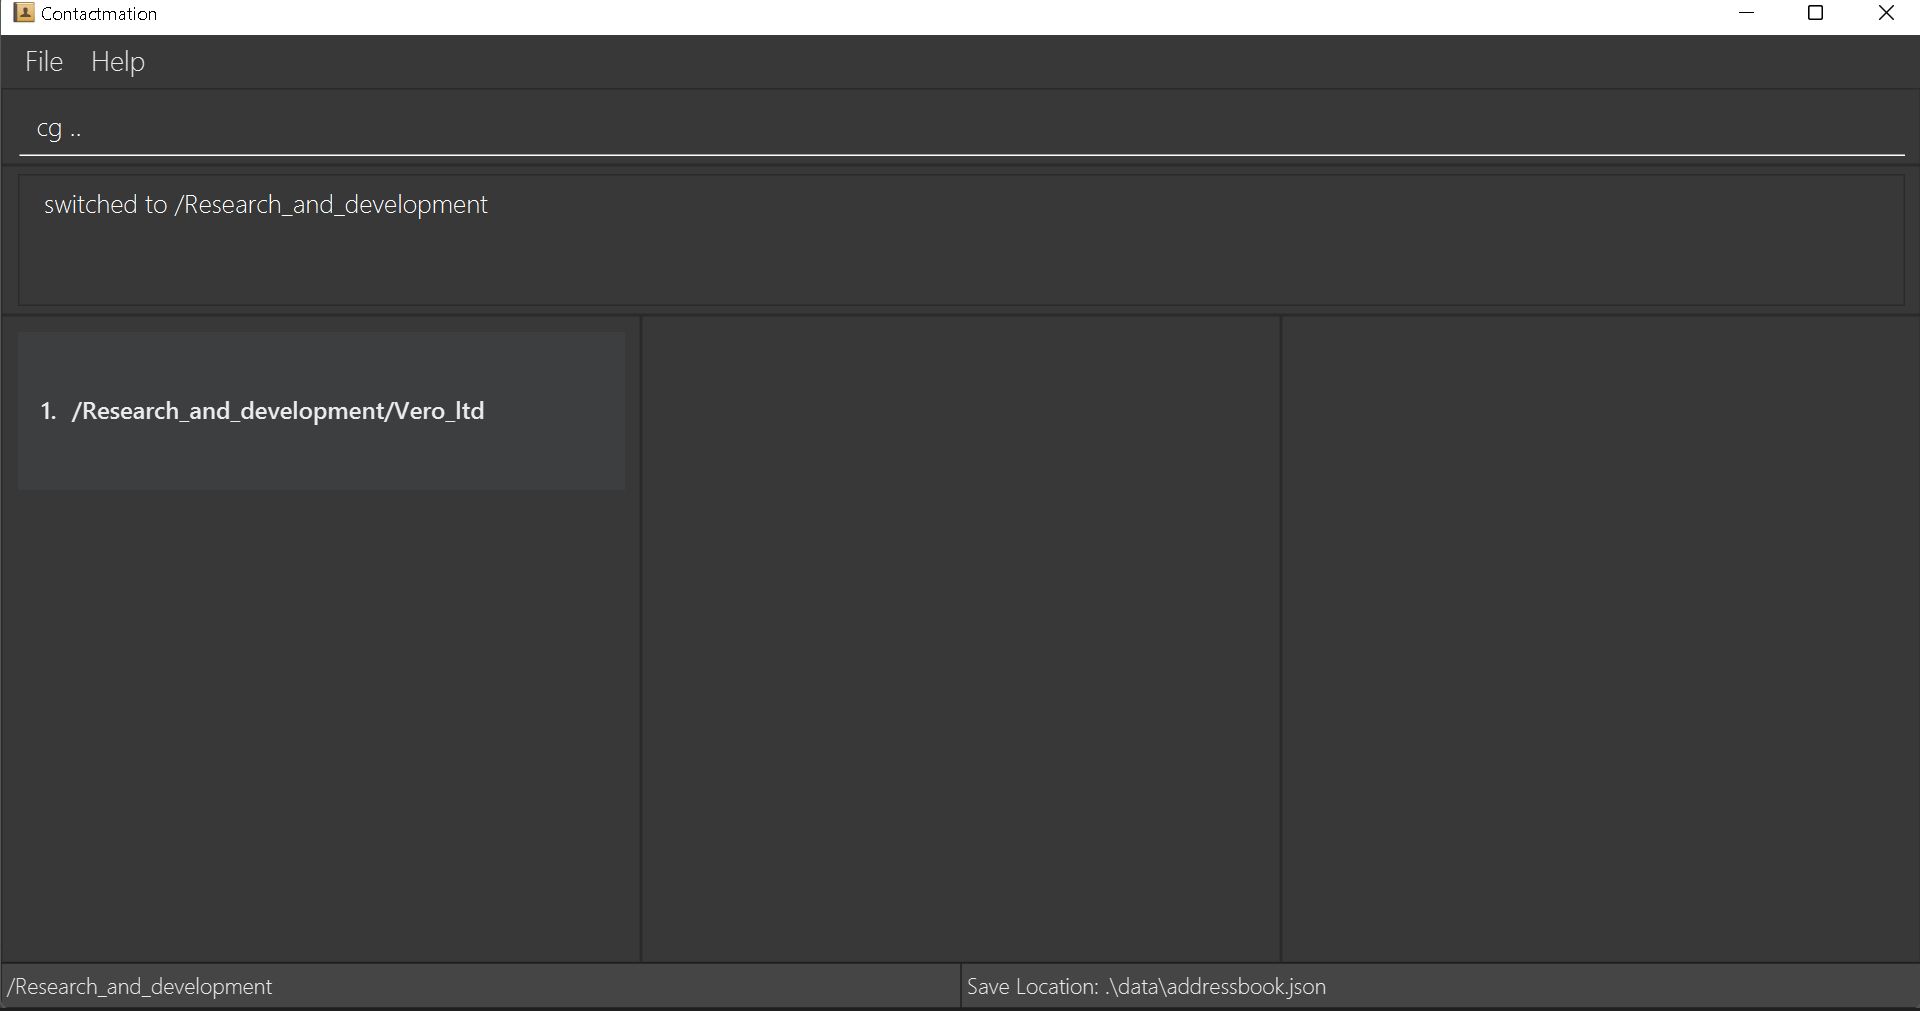
When we are in the /Research_and_development group, we can see that there is a group in the group list.
That is the group we were in at first, before we used the cg .. command!
-
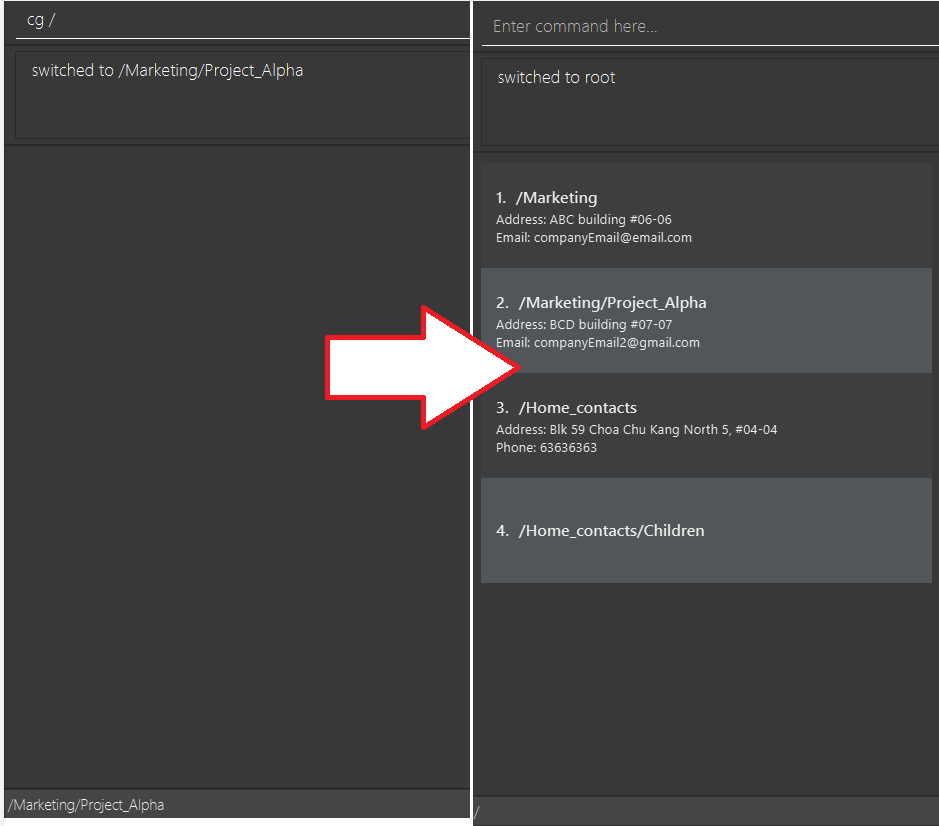
cg /moves you to the root group in Contactmation. From the root group, you are able to see all the groups currently existing in Contactmation.
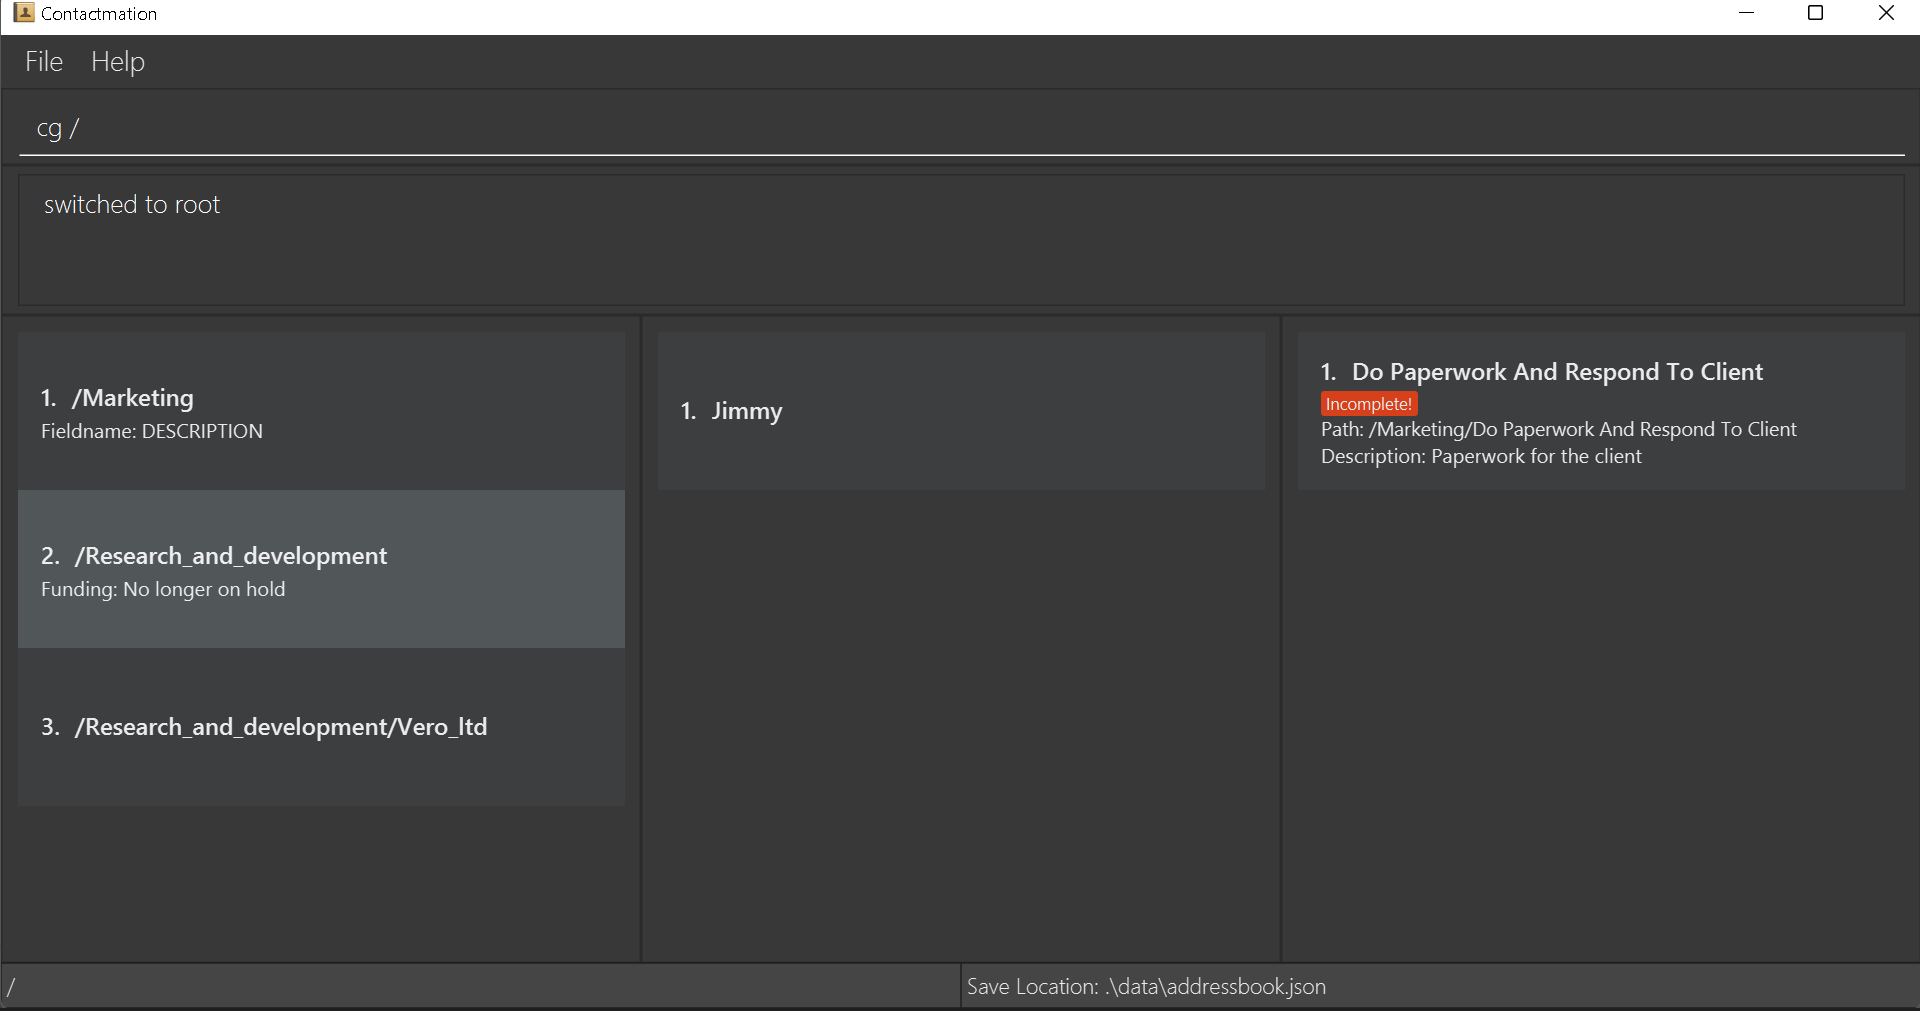
Following the previous examples in for the cg command, we see the /Research_and_development group,
/Research_and_development/Vero_ltd and an additional group, /Marketing, all at once!
Examples:
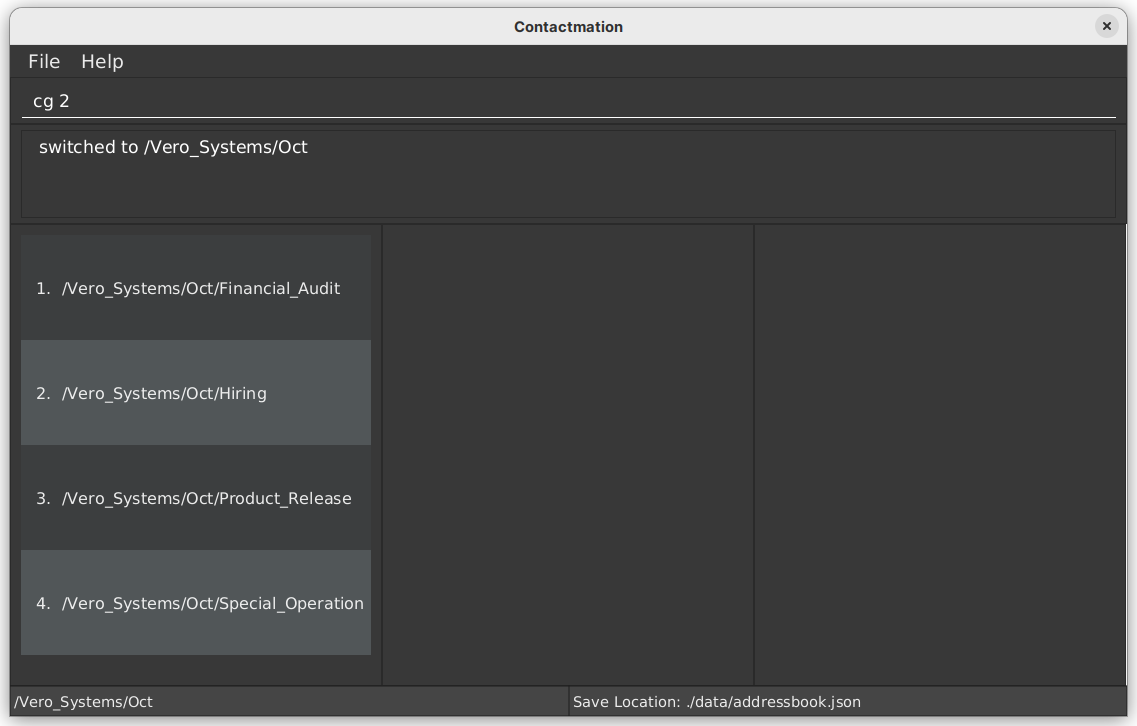
-
cg 3- The above command allows you to navigate to team number 3 in your current team list.
- Before:
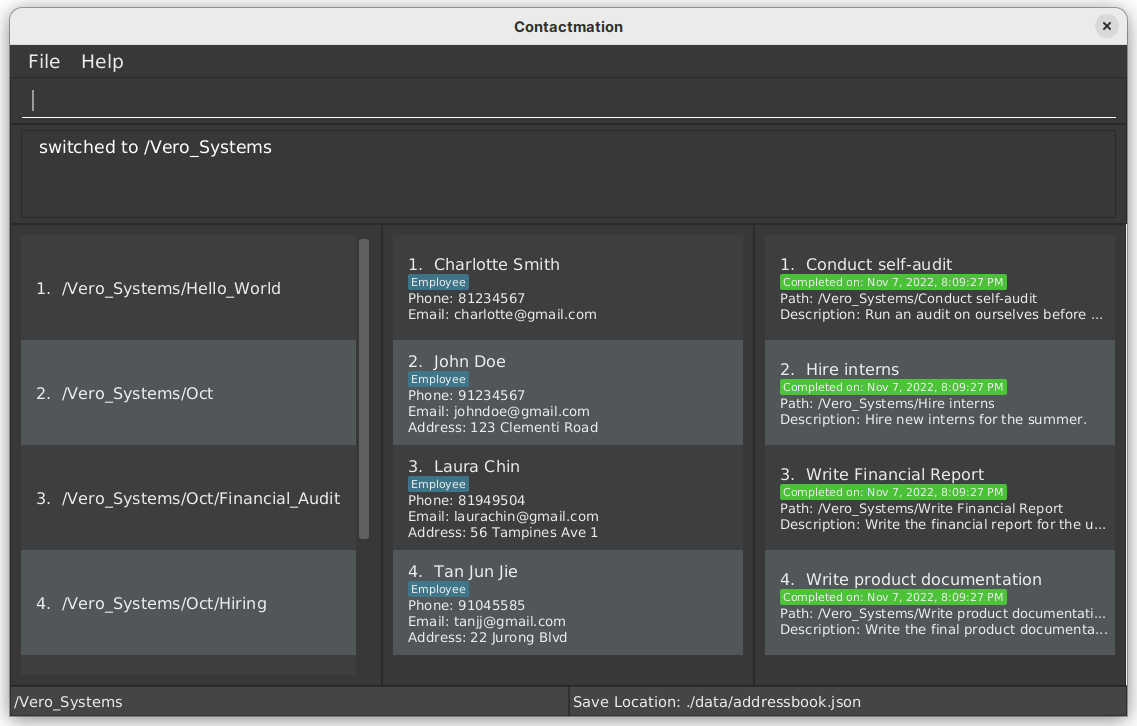
- After:
cg ..
cg /
![]() Note for experienced programmers:
Note for experienced programmers:
If you are familiar with UNIX-based operating systems such as Linux or familiar with using terminal, the navigation
command (cg) in Contactmation follows a similar syntax to the change directory command (cd).
Add new contacts within a team
Once you have navigated to a team, you can add a new contact within that team, which is done through the same command as adding a contact to Contactmation.
Removing contacts from team: team remove
Removes the contact from the current group by their currently specified INDEX as shown in
the application window.
There is an important distinction between a team remove and a team delete. In team remove,
the INDEX refers to a person, whereas in team delete, we are deleting a team altogether
from Contactmation.
![]() Note:
Note:
This command simply removes a person from the team you are currently in. But this does not
mean that the person is deleted from Contactmation! The person can still be found in the root group.
Format: team remove <INDEX>
Example:
-
team remove 3- This command removes contact number 3 in the specified team, and transfers the contact to the root group.
Creating and Deleting a subteam
Contactmation allows the creation and deletion of a subteam within a team using the same command as creating a team and deleting a team.
Finding a team: find
Contactmation allows for searching of teams with the find command.
3. Person commands
Person commands are used to add and manage people within Contactmation. This section will showcase the different commands that can be used on persons.
Contact-related commands precede with the person keyword.
Add a Person: person new
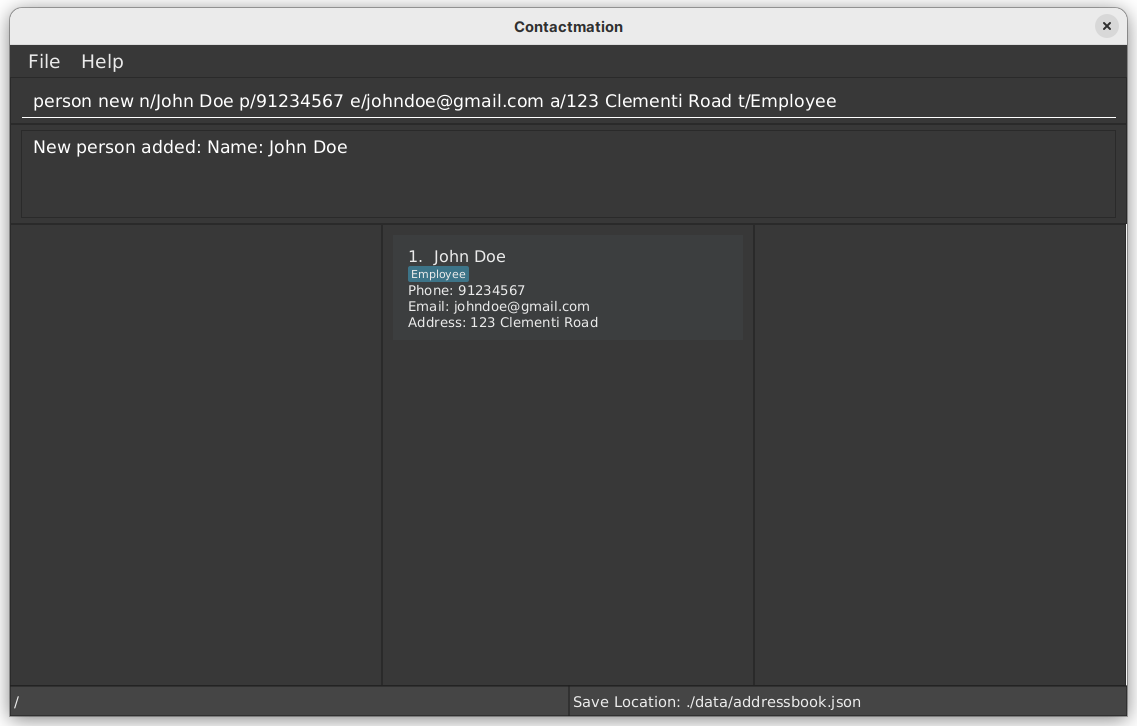
Let us start off by adding a person to Contactmation. To add a contact, you can use the command person new,
followed by the name of the person. You can also choose to provide the phone number, email and address
to each person, or add a tag to identify each person.
Format: person new n/<NAME> [p/<PHONE>] [e/<EMAIL>] [a/<ADDRESS>] [t/<TAG>]...
Examples:
To add a person with the name ‘Alice Green’, you may execute the following commmand.
person new n/Alice Green
To add a person with the name ‘Hilbert Stewart’, whose phone number is +91 368 91829383, email is hilbertstewart@gmail.com, address is ‘68 Hudson Street’, and is tagged as friend, you may execute the following command.
person new n/Hilbert Stewart p/+91 368 91829383 e/hilbertstewart@gmail.com a/68 Hudson Street t/friend
Delete a person: person delete
Suppose that you want to remove a person from Contactmation. You can use the person delete command to delete a contact
from the list of persons in the current scope.
Format:
person delete <INDEX>-
person select <INDEX> person deleteSee select command
The index refers to the index number shown in the displayed person list. The index should follow the format described by the constraints on placeholder words.
Example:
To delete person number 1 in the list of persons, you can execute:
person delete 1
Assign a user to a group: assign
If you want to place an existing person into a group, you can use this command.
![]() Note:
Note:
This command only works if the person is not part of the group yet.
Format:
assign u/<INDEX> g/<INDEX>
Example:
If you want to add the first person in your person list into the second group on
your group list, your command will be assign u/1 g/2.
Finding a person: find
Contactmation allows for searching of person with the find command.
4. Task commands
After adding your contacts, and allocating them into teams, you can give them tasks! This section will showcase the different commands that can be used on tasks.
Task-related commands precede with the task keyword.
![]() Notes about tasks:
Notes about tasks:
Tasks can only be added if you are within a team. To check whether you are in a team, look at your
current team and ensure it is not the root group, which
is when the current team is (/).
Adding a task to a team: task add
Adds a new task to an existing group scope. This group cannot be the root group.
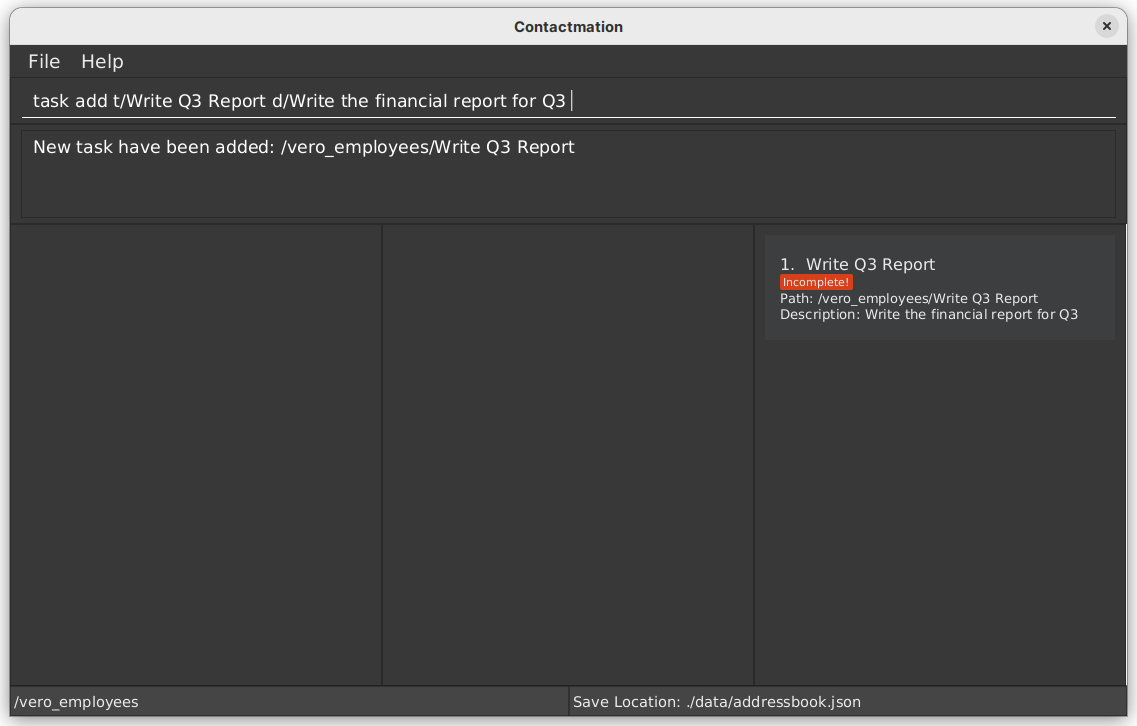
Format: task add t/<TITLE> d/<DESCRIPTION>
Example:
task add t/Complete all CS2103T homework d/Give description here
Deleting a task from team: task delete
Deletes an existing task from a group by their INDEX within the current scope.
Format:
task delete <INDEX>-
task select <INDEX> task deleteSee select command
Example:
-
task delete 1- This command deletes the first task in the task list.
Mark a task: task mark
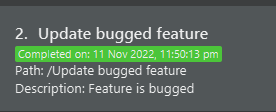
Marks a task as complete, with the current time as the completed time of the task.
Format:
task mark <INDEX>-
mark <INDEX>(task here can be optional!) -
task select <INDEX> markSee select command
Example:
-
task mark 1- This command marks the first task in the task list.
- An example of a marked task
Unmark a task: task unmark
Unmarks a task. The task will return to be Incomplete.
Format:
task unmark <INDEX>-
unmark <INDEX>(task here can be optional!) -
task select <INDEX> unmarkSee select command
Example:
-
task unmark 1- This command unmarks the first task in the task list.
-
An example of a unmarked task

Finding a task: find
Contactmation allows for searching of tasks with the find command.
Advanced features
Now, there might be many things that you wish to do with managing your tasks and groups. However, it feels really, really tedious to perform multiple functions one after the other. Are you a power user? Are you good with logic? Well this section is for you! Supercharge your user experience by adding and customizing your own commands and features!
Firstly, let’s understand what these commands are and how these commands work in Contactmation.
Advanced features overview: Chaining
Most of the commands in Contactmation can take in an input and give an output. This is similar to how your functions work in programming and mathematics.
For instance, take the command ops. This command can take in a value, perform some operators on it and returns
the value. Another command is the command float. This command allows you to create a floating point value and return
it.
Many commands in Contactmation have this functionality, and you can in turn chain multiple commands together to perform complicated tasks that suits your needs.
So, how do we chain multiple commands together? We can use the | and ; and the seq command to do so. The way
this commands work is extremely similar to how | and ; works on a UNIX operating system. You can chain multiple
commands together like such:
seq <command 1> [| command 3]...seq <command 1> [; command 3]...
Whenever a pipe symbol (|) is encountered, the output of the previous commands is then passed to the next command.
Whenever (;) is used, the output of the previous commands are not passed on.
All commands that produce an output supports the use of | to “pipe” their output to the subsequent commands.
Advanced feature constraints
While these advanced features can make your Contactmation experience a lot smoother, it is also subject to certain limitations. These are the following constraints for each keyword in the format section of each advanced feature command:
- The
MACRO WORDis alphanumeric but hyphens and underscores are allowed. It must also begin with a letter. -
INPUTis a string of any length.
Here are some commands that will aid you in gaining better control over Contactmation:
Select command
This command allows you to select a specific group, contact or task by their INDEX. While this command does nothing
by itself, it is useful as a precursor to chaining other commands after it.
A list of such commands includes:
-
<ITEM> deletecommands liketask delete,team delete,person delete -
task markandtask unmark -
cgcommand -
renamecommand - field related commands
-
field editcommand -
field deletecommand -
field addcommand
-
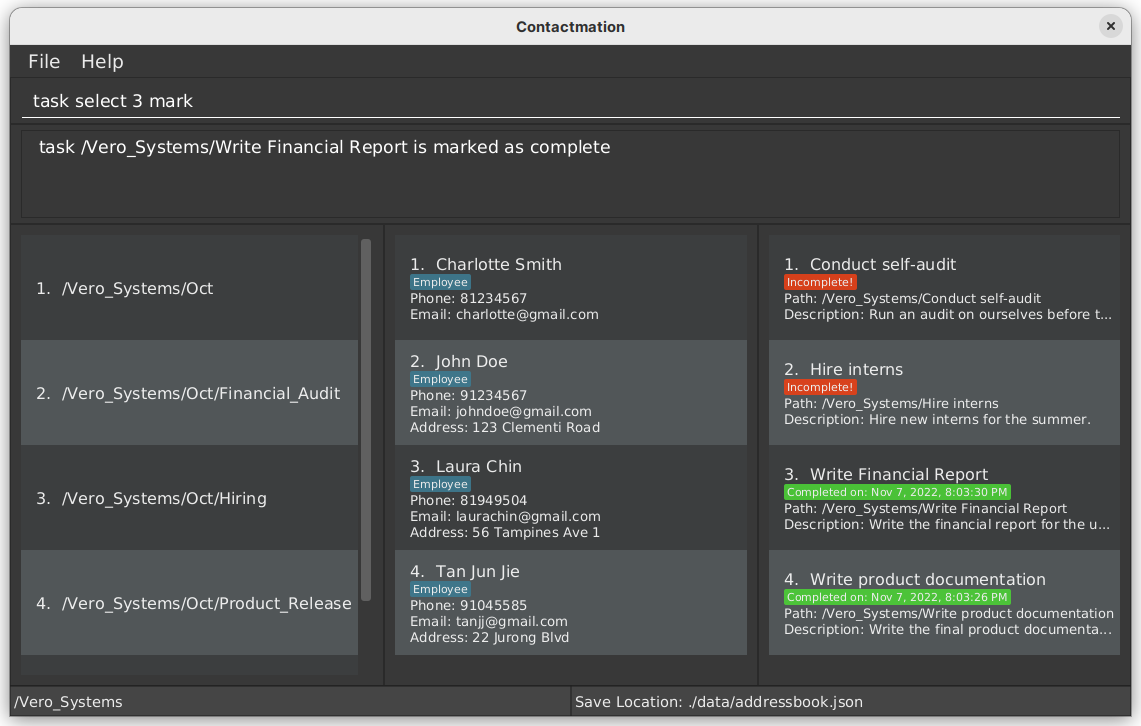
Format: <ITEM> select <INDEX> <COMMAND> [...]
Example:
task select 3 mark
Contains command
You can use the contains command which takes in an item and checks if it contains a certain attribute. If it does,
then the attribute description will be shown in the result display if there is no further piping.
Format: <ITEM> contains <ATTRIBUTE>
Example:
task select 1 contains bug
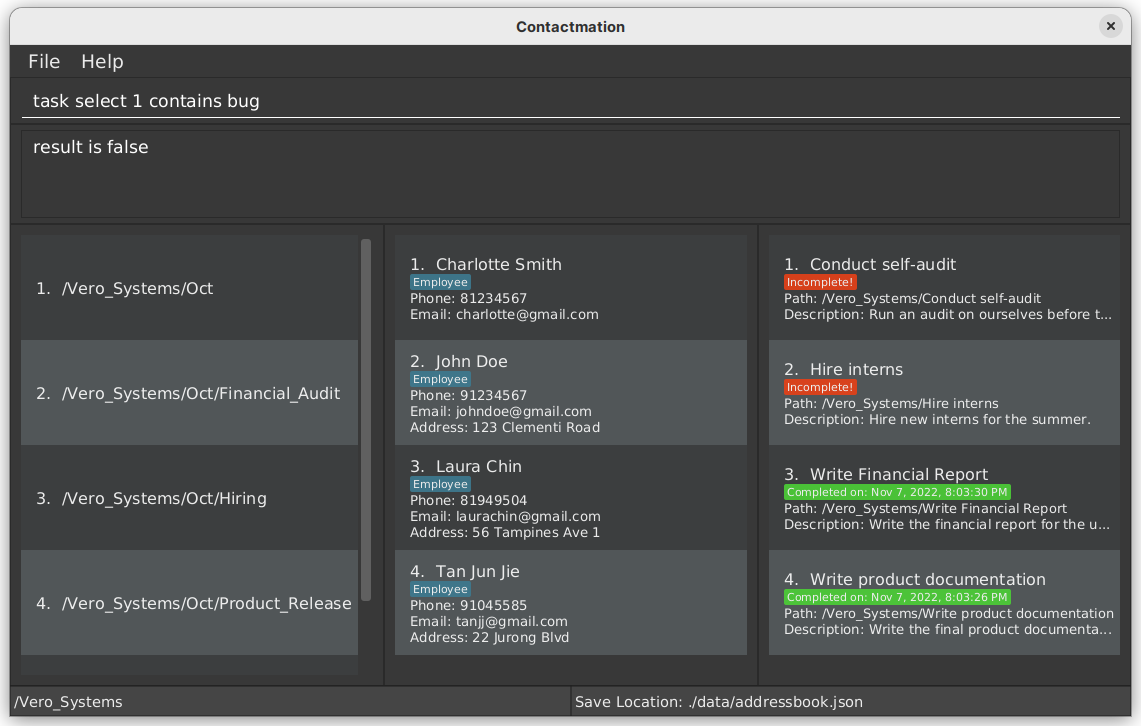
Here, we see that there are no bug attribute in the task New Burger Recipes.
Execute command
This command allows for the running of a command on a piped string.
Format: <INPUT> | e
Example:
Who lives in a pineapple under the sea | e
Replace command
This command replaces a piece of text with another piece of text.
Format: r <TEXT TO REPLACE> <TEXT TO BE REPLACED>
Example:
r tetss te%ssts
Foreach command
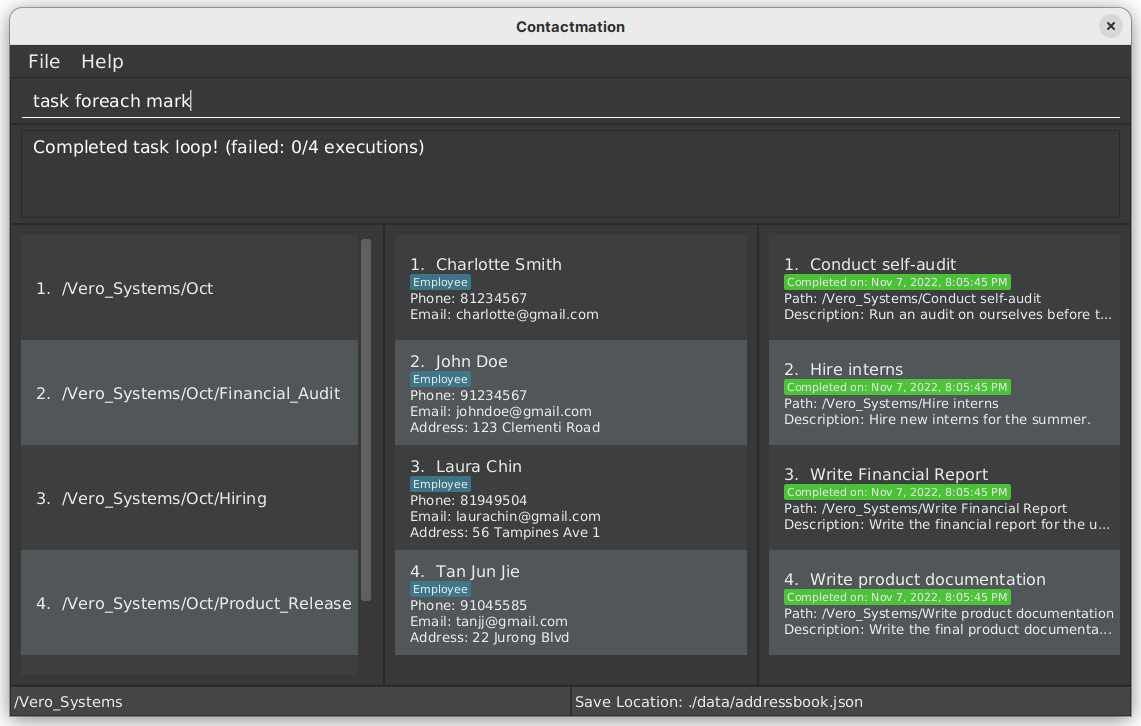
Iterations can increase our workflow efficiency several fold, and through the foreach command, we can now cycle
through all entries of an item type in the current scope and apply a command to them. This can be especially powerful
when combined with piping to do complex executions with a single command!
Format: <ITEM> foreach <COMMAND>
Example:
task foreach mark
If / else command
This command behaves exactly like if else statements in programming languages. If the CRITERIA specified is met,
then the command sequence will execute COMMAND IF, else it will execute COMMAND ELSE instead. The command
ensures that the application cannot run COMMAND IF and COMMAND ELSE in the same command sequence.
Note: If else commands cannot be nested in other if else commands directly.
Format: if [[CRITERIA]] ;; [[COMMAND IF]] ;; [[COMMAND ELSE]]
Example:
task select 1 if [[contains bug]] ;; [[mark]] ;; [[task delete]]
Aliasing
Aliasing is very useful to have in case you do not agree with the default naming scheme in Contactmation! Here’s how it works:
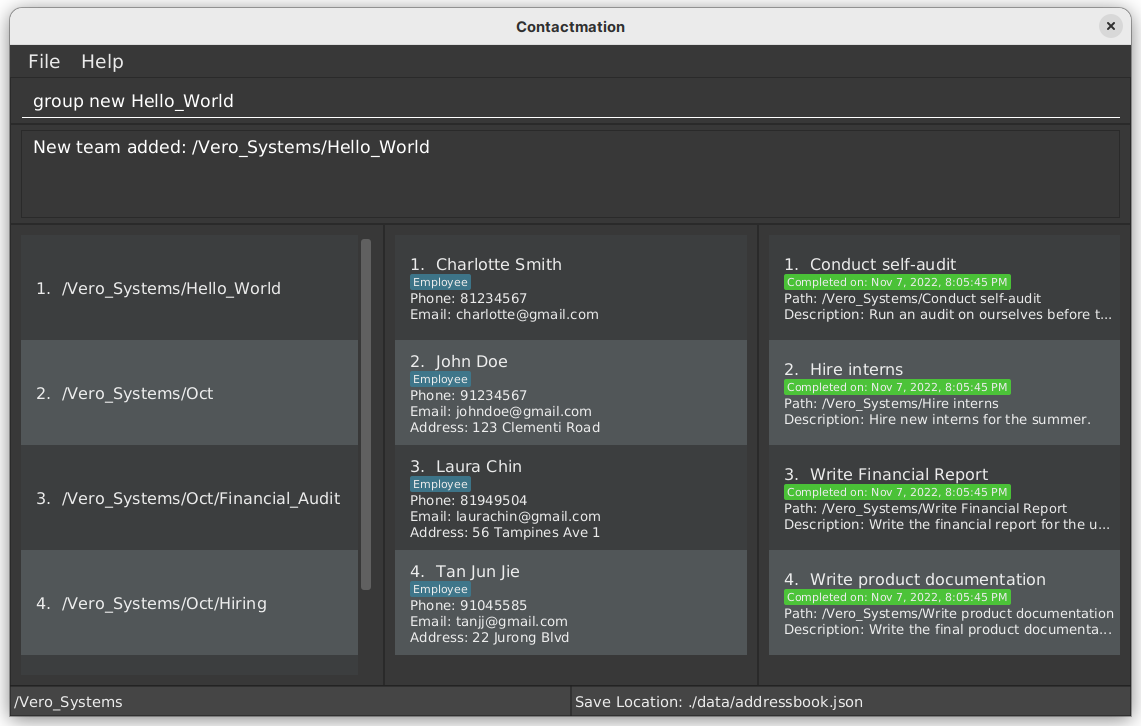
Format: alias <NEW COMMAND NAME> <COMMAND>
Example:
alias group team
If you feel that you are more comfortable using the keyword group to represent team. After running alias group team, you are now able to use the command group as if it was a team!
Custom command / Macro
Do you ever feel tired from typing the same commands over and over again? Do you find yourself highlighting your commands and copying and pasting them? Macros are available in our application to solve this problem of yours.
All you have to do is assign the command sequence to a single word, or multiple words separated by hyphens and underscores only. After that, when the word is typed into the command box, the command sequence it is used to represent will run!
Format: macro <MACRO WORD> <COMMAND SEQUENCE>
Example:
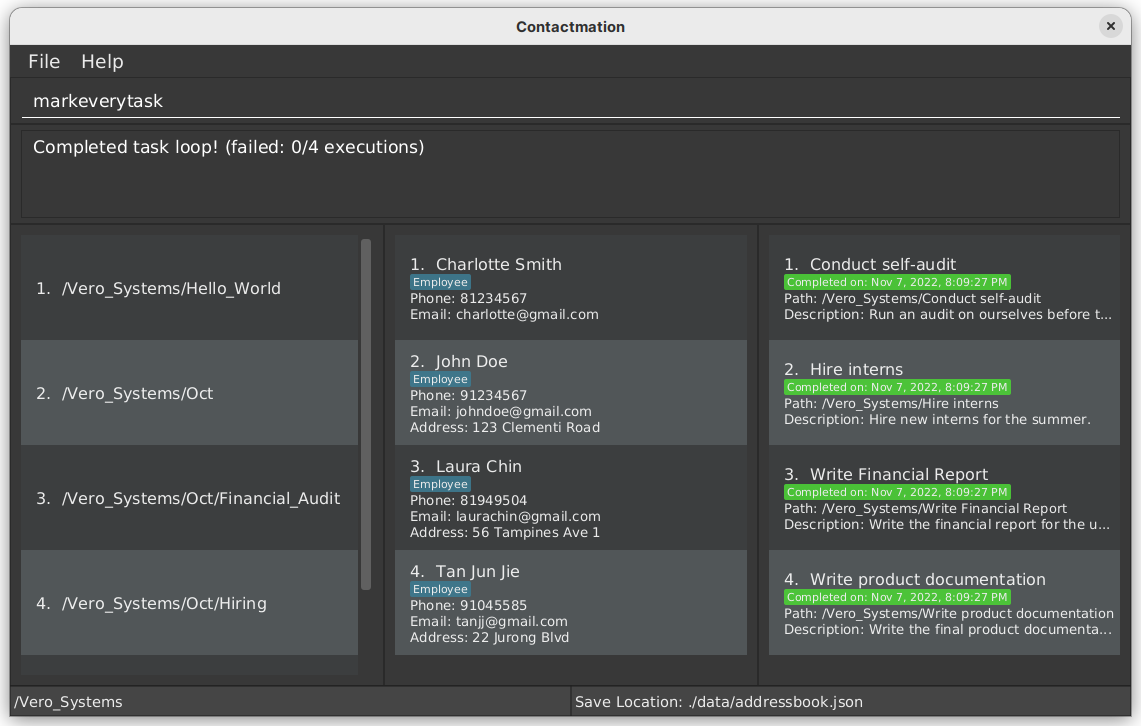
macro markeverytask task foreach mark
This will produce the following output:
When markeverytask is typed into the command box, all tasks become marked!
Piecing multiple commands together
Here’s another example. You have just completed fixed a bunch of bugs you would like to mark off all tasks that was bugged as complete.
Well, you know that you defined your custom field’s type as bug and you can see that task 1, 2 and 3 are bug
related tasks with the Severity labelled as a custom field in the bugs.
Well, you could of course just do mark commands 3 times and mark all the tasks, but what if there are a few
hundred of those pesky bug tasks that you and your team fixed?
Luckily for you, Contactmation supports the automation of commands!
Here is an example of a command sequence to search through all tasks and mark all tasks which have bug severity ratings:
task foreach if [[contains bug]] ;; [[mark]]
Using just 1 command sequence, you are able to do the work that many normal commands would similarly achieve and mark hundreds of tasks in a matter of seconds!
FAQ
How do I check whether
Java 11is installed on my computer?
This depends on the type of computer you are using.
If you are using a Windows device:
- Click the search icon in the task bar on your desktop.

- Search for
Command Promptand open the application. - Type in
java -versionin theCommand Promptapplication. You should see something similar to this:

- When you press the
Enterkey on your computer, you should be greeted with something similar to this:

- The
Javaversion in this example is listed asjava version 11.0.10.
If you are using a Macbook:
- Open the terminal by clicking on
Launchpadand searching forterminalin the search bar.

- Follow steps 3 onwards from here.
If you are using a Linux machine:
Due to the wide variety of Linux distributions out there, you will need to search online
on how you can check for Java 11 for your respective distribution.
Generally, the process in checking for your Java version on your Linux distribution is to:
-
Open the terminal.
-
Type
java -versionand see if there is an output. If there is no output, thenJavais not installed. If there is an output, then check if the version forJavais correct. Refer to part 3-5 of the Windows section of this question for more information.
Here are some helpful guides for popular Linux distributions such as Ubuntu.
How can I install
Java 11?
Follow the guide for installing Java 11 here.
Why does my group name start with a
/?
You might encounter this when adding a group to Contactmation:

This is because the Marketing group is under the root group, which is named by
default with a slash (/). Therefore, when a group name is /Marketing, it means that the Marketing
group is a subgroup of the root group.
How do I save my preferred window size when viewing Contactmation?
You can do this by exiting using the exit command.
How do I check whether I have access rights to Contactmation on my computer?
Contactmation must be stored in a location that does not have administrative rights to function properly,
such as C:/ program files.
You can simply save Contactmation into your D:/ drive instead of your C:/ drive, or store Contactmation
on your Desktop.
To check the location of Contactmation, do the following steps:
-
Right-click on Contactmation.
-
Click on
Properties. -
You should see the following pop-up:
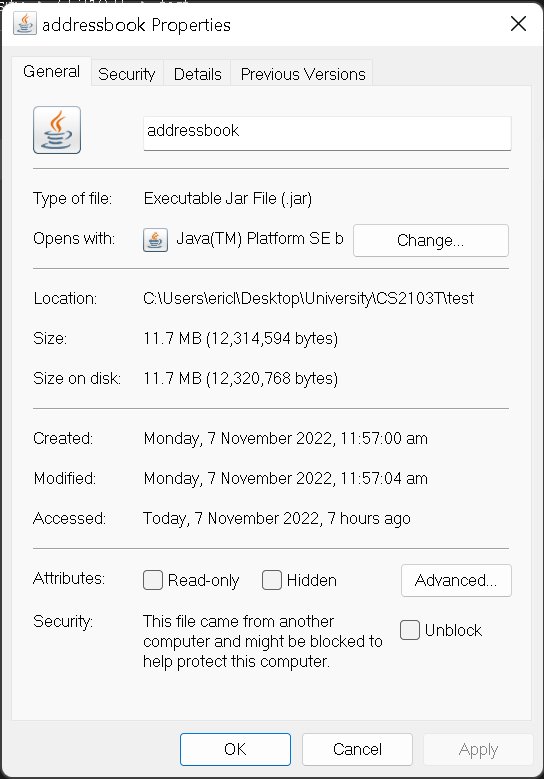
- Here, we can see that under
Location, we haveC:/andDesktop. This means that the location Contactmation does not need administrative rights to access. Therefore, there should be no problem in starting and running Contactmation.
Why is there an error in my result display stating:
Unable to save your information!?
This is due to an error in saving your Contactmation details in a separate file. To combat this, use the following steps:
-
Check if you need administrative rights to access the home folder where Contactmation is stored.
-
Your home folder should look something like this at first.

-
There are several files of note, which consists of the
datafolder,configfile andpreferencesfile. If thedatafolder is not present, then the following steps can be ignored for thedatafolder. If thedatafolder is present, then you should also find anaddressbookfile within thedatafolder. The following steps are forconfig,preferencesand theaddressbookfile. -
Right-click on the file, and select
Properties. You will be greeted a pop-up similar to this:
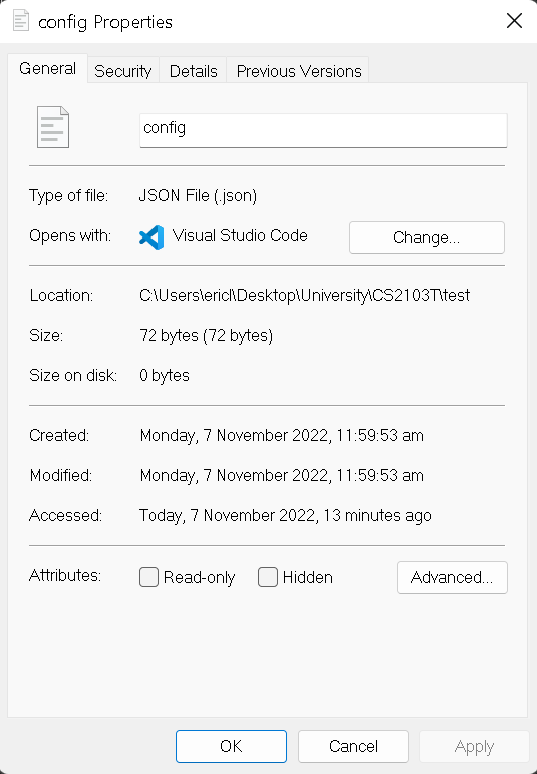
-
Under
Attributesin theGeneralsection, ensure thatRead-onlyis not ticked. -
Click
ApplyandOKto save your changes. -
Repeat steps 4 to 6 with the
config,preferencesand theaddressbookfile.
Will this application also apply to a general, non-professional user?
This depends on what you will be using Contactmation for. It still can be used simply as an application for simply saving and organizing contacts.
Future plans
Our future plans for Contactmation includes:
- The ability to delegate tasks to individuals.
- Contacting any person through the application simply by clicking their email, phone number etc.
- Releasing a version of Contactmation on the mobile platform.
- The ability to synchronize data between multiple copies of Contactmation on your mobile and desktop.
- A pop-up window that shows the detailed form of descriptions to the user.
- A for loop command to iterate through and count groups, contacts or tasks by their attribute.
Glossary
| Vocabulary | Description |
|---|---|
| CLI / Command Line Interface | You can only interact with the application through text, which is typed in the command box. |
| Command / Command sequence | What you would write in the command box to interact with the application. |
| Contact | A contact with contact information. |
| Alphanumeric | The text can contain capitalised and non-capitalised alphabets and numbers only. |
| Field | A way to represent additional information for a group, person or task. |
| Team | A container that contains people that work on a similar project. |
| Index | The numerical placing of a group, contact or task in the current application display. |
| Item | An item can refer to a group, contact or task. |
| Pipe | The output of the previous section of commands will be used as input for the next set of commands. |
| Root group | Refers to the application being able to view all groups in the display. |
| Task | Assigned to people or groups. |
| Word | Text in a command sequence that is separated from other words by a white space. |
Command summary
General commands summary
| Command | Format |
|---|---|
| Clear all items from Contactmation | clear |
| Exit Contactmation | exit |
| Add additional information to an item |
field add u/<INDEX> <FIELD NAME> <DESCRIPTION> or field add g/<INDEX> <FIELD NAME> <DESCRIPTION> or field add t/<INDEX> <FIELD NAME> <DESCRIPTION>
|
| Edit some additional information in an item |
field edit u/<INDEX> <FIELD NAME> <NEW DESCRIPTION> or field edit g/<INDEX> <FIELD NAME> <NEW DESCRIPTION> or field edit t/<INDEX> <FIELD NAME> <NEW DESCRIPTION>
|
| Delete some additional information in an item |
field delete u/<INDEX> <FIELD NAME> or field delete g/<INDEX> <FIELD NAME> or field delete t/<INDEX> <FIELD NAME>
|
| Rename the name of items on the screen |
rename u/<INDEX> <new name> or rename g/<INDEX> <new name> or rename t/<INDEX> <new name> or <ITEM> select <INDEX> rename <new name>
|
| Find a person, group or task | <ITEM> find <KEYWORD> [<MORE_KEYWORDS>] |
Group commands summary
| Command | Format |
|---|---|
| Adding new team | team new <NAME> |
| Delete team |
team delete <INDEX> or team select <INDEX> team delete
|
| Changing teams |
cg <INDEX> or cg .. or cg /
|
| Removing contact from current team | team remove <Contact INDEX> |
| Finding a team | team find <KEYWORD> [<MORE_KEYWORDS>] |
Person commands summary
| Command | Format |
|---|---|
| Adding new person to current context | person new n/<NAME> [p/<PHONE_NUMBER>] [e/<EMAIL>] [a/<ADDRESS>] [t/<TAG>...] |
| Delete a person |
person delete <INDEX> or person select <INDEX> person delete
|
| Assigning a user to an existing group | assign u/<INDEX> g/<INDEX> |
| List all contacts in a team | list |
| Finding/filtering persons | person find <keywords> |
Task commands summary
| Command | Format |
|---|---|
| Adding new task to current context | task new t/<title> d/<description> |
| Delete a task |
task delete <INDEX> or task select <INDEX> task delete
|
| Marking a task as complete |
task mark <INDEX> or mark <INDEX> or task select |
| Marking a task as incomplete |
task unmark <INDEX> or unmark <INDEX> or task select |
| Finding/filtering tasks | task find <keywords> |
Advanced commands summary
| Command | Format |
|---|---|
| Aliasing | alias <NEW COMMAND NAME> <COMMAND> |
| Saving macros | macro <NEW COMMAND NAME> <COMMANDS TO CHAIN> |
| Deleting Custom Commands | rmMacro <COMMAND NAME> |
| Chaining/seq | seq <command 1> [ | command 3]... OR seq <command 1> [; command 3]... |
| Contains | <ITEM> contains <ATTRIBUTE> |
| Execute | <INPUT> | e |
| Foreach | <ITEM> foreach <COMMAND> |
| If else | if [[CRITERIA]] ;; [[COMMAND IF]] ;; [[COMMAND ELSE]] |
| Macro | macro <MACRO WORD> <COMMAND SEQUENCE> |
| Replace | r <TEXT TO REPLACE> <TEXT TO BE REPLACED> |
| Select | <ITEM> select <INDEX> <COMMAND> [...] |
| Create/convert int | int <integer> |
| Create/convert float | float <float> |
| Create/convert String | str <String> |
<...> | print |

