Developer Guide
- Acknowledgements
- Setting up, getting started
- Design
- Implementation
- Documentation, logging, testing, configuration, dev-ops
- Appendix: Requirements
- Appendix: Instructions for manual testing
Acknowledgements
- {list here sources of all reused/adapted ideas, code, documentation, and third-party libraries – include links to the original source as well}
Setting up, getting started
Refer to the guide Setting up and getting started.
Design
.puml files used to create diagrams in this document can be found in the diagrams folder. Refer to the PlantUML Tutorial at se-edu/guides to learn how to create and edit diagrams.
Architecture
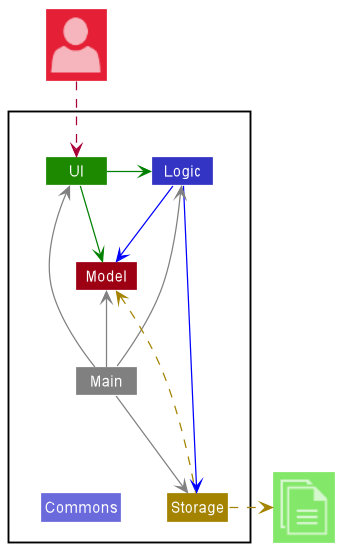
The Architecture Diagram given above explains the high-level design of the App.
Given below is a quick overview of main components and how they interact with each other.
Main components of the architecture
Main has two classes called Main and MainApp. It is responsible for,
- At app launch: Initializes the components in the correct sequence, and connects them up with each other.
- At shut down: Shuts down the components and invokes cleanup methods where necessary.
Commons represents a collection of classes used by multiple other components.
The rest of the App consists of four components.
-
UI: The UI of the App. -
Logic: The command executor. -
Model: Holds the data of the App in memory. -
Storage: Reads data from, and writes data to, the hard disk.
How the architecture components interact with each other
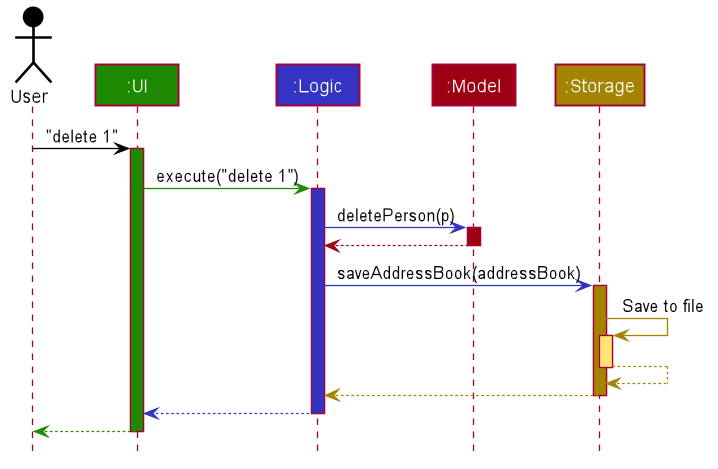
The Sequence Diagram below shows how the components interact with each other for the scenario where the user issues the command delete 1.
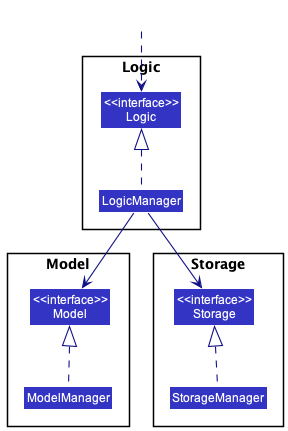
Each of the four main components (also shown in the diagram above),
- defines its API in an
interfacewith the same name as the Component. - implements its functionality using a concrete
{Component Name}Managerclass (which follows the corresponding APIinterfacementioned in the previous point.
For example, the Logic component defines its API in the Logic.java interface and implements its functionality using the LogicManager.java class which follows the Logic interface. Other components interact with a given component through its interface rather than the concrete class (reason: to prevent outside component’s being coupled to the implementation of a component), as illustrated in the (partial) class diagram below.
The sections below give more details of each component.
UI component
The API of this component is specified in Ui.java
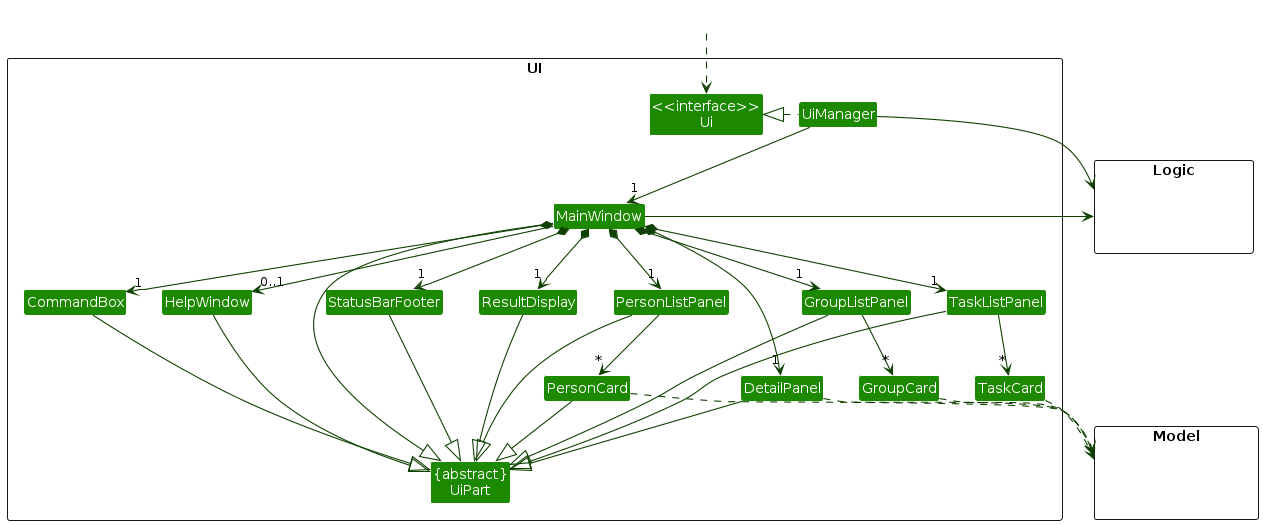
The UI consists of a MainWindow that is made up of parts e.g.CommandBox, ResultDisplay, PersonListPanel, StatusBarFooter etc. All these, including the MainWindow, inherit from the abstract UiPart class which captures the commonalities between classes that represent parts of the visible GUI.
The UI component uses the JavaFx UI framework. The layout of these UI parts are defined in matching .fxml files that are in the src/main/resources/view folder. For example, the layout of the MainWindow is specified in MainWindow.fxml
The UI component,
- executes user commands using the
Logiccomponent. - listens for changes to
Modeldata so that the UI can be updated with the modified data. - shows the an active view of the currently available content based on filter and current context.
- keeps a reference to the
Logiccomponent, because theUIrelies on theLogicto execute commands.
The DetailPanel component of the UI will display a finer detail of the currently selected DisplayItem that is chosen inside Model.
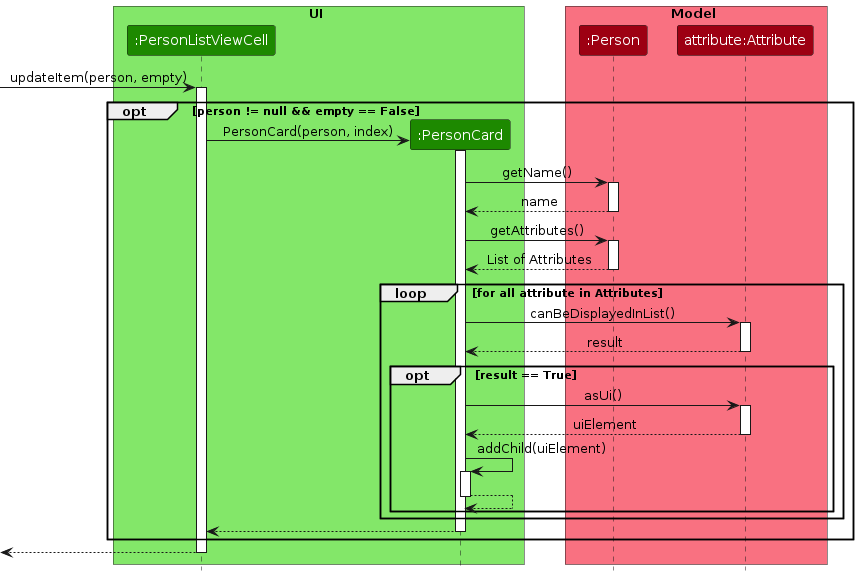
How UI displays and updates DisplayItem’s in list view. Below will illustrate how any DisplayItem is generated as an card UI and then added into the corresponding ListPanel.
- Whenever the
ObservableListinsideModelis modified or changed, each changed item will callupdateItem()method inside the respective ListPanelCell inner class found inside the respective ListPanels. - The cell will then build the card for the item by calling the
xxxCardclass which represents an UI card object that will be used in the ListView Panel. - For each attribute in the item, the Card class will add a corresponding child element to the Card.
- The generated Card is then added to the ListView.
The Sequence Diagram below illustrate how the Person Cell is generated with its attributes when Person is changed.
Logic component
API : Logic.java
Here’s a (partial) class diagram of the Logic component:
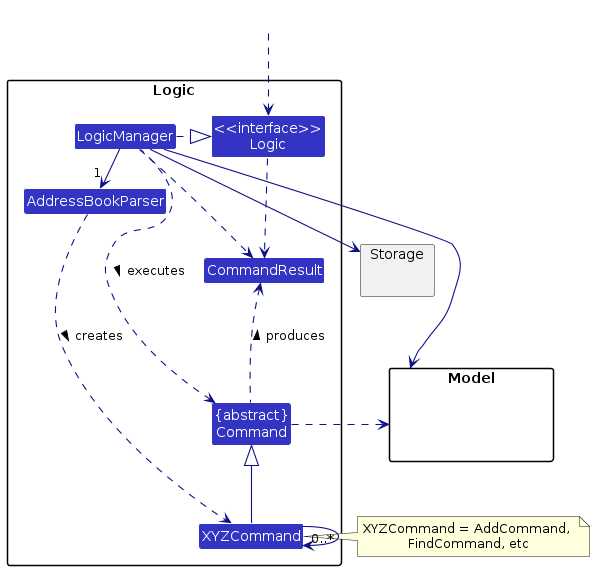
How the Logic component works:
- When
Logicis called upon to execute a command, it uses theAddressBookParserclass to parse the user command. - This results in a
Commandobject (more precisely, an object of one of its subclasses e.g.,AddCommand) which is executed by theLogicManager. - The command can now takes in additional optional inputs (either from piping or from creation commands).
- The command can communicate with the
Modelwhen it is executed (e.g. to add a person). - The command can also now create new commands / look for next commands to execute (e.g. seq, if else, piping)
- Additional information that the command would pass to the next command will be then encapsulated along with the result of the command execution as a
CommandResultobject which is then returned back fromLogic.
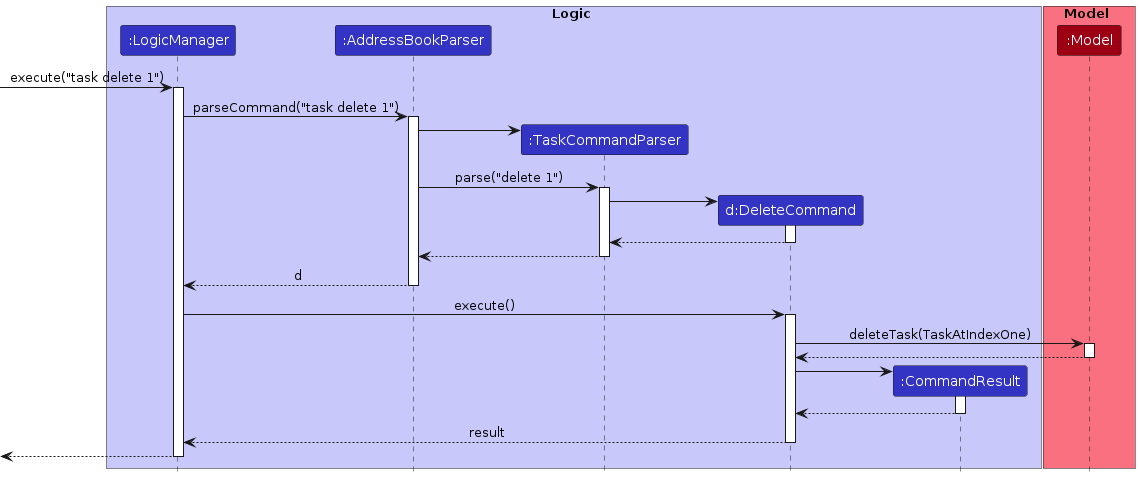
The Sequence Diagram below illustrates the interactions within the Logic component for the execute("task delete 1") API call. Note that this is a nested api call where a selector type is given (task, person, team) and followed by a secondary command. This is handled via a 2 layer parser and the type parser will parse the subsequent text.
We can illustrate another way of invoking delete command via piping 1 into delete command. This is likely called by some other command (xxxComand e.g. (task select 1 task delete)).
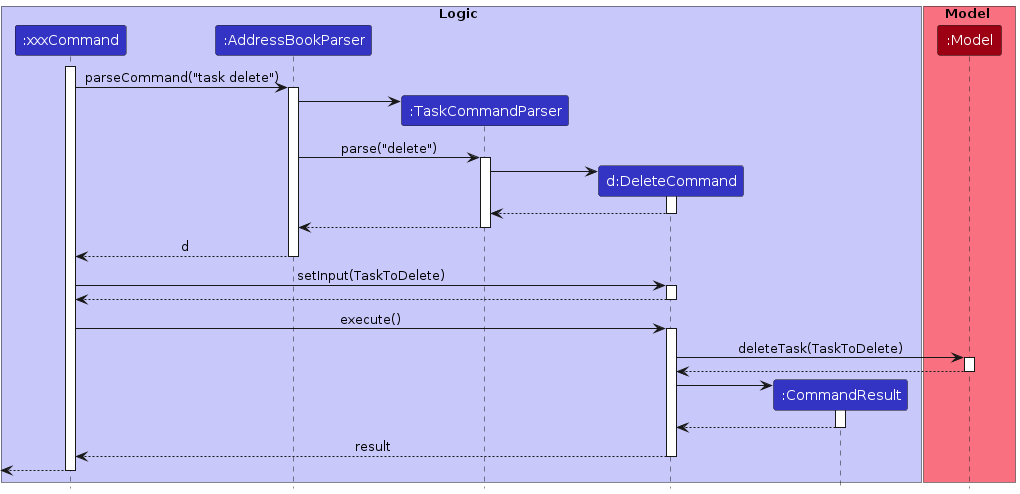
Here the object of the task to be deleted is passed in to the setInput parameters. Because there is already an input and no index were provided, the delete command will use the input set by the xxxCommand instead and delete that element from model. By using commands like seq, if else etc. We can essentially chain multiple commands together to form complicated commands.
If you think about the implementation, this is highly similar to how Java Stream is implemented, where a pipe command is similar to a map command where data is being passed and re-evaluated.
DeleteCommandParser should end at the destroy marker (X) but due to a limitation of PlantUML, the lifeline reaches the end of diagram.
Teams and Persons
2 Layer commands like teams and persons (e.g., team new, team delete, …) follow a similar sequence of interactions like above.
Changing of Team Scope
However, during execution, team commands may update the context of the current team scope. To understand teams better,
Teams are analogous to folders in a basic file system, which can contain other folders (Team), or other
files (Person or Task).
The Sequence Diagram below shows the interaction between the Logic and Model component when execute("cg ..")
is called.

This way of implementation maintains abstraction of details within the Model component from the Logic component.
Parsing
Here are the other classes in Logic (omitted from the class diagram above) that are used for parsing a user command:
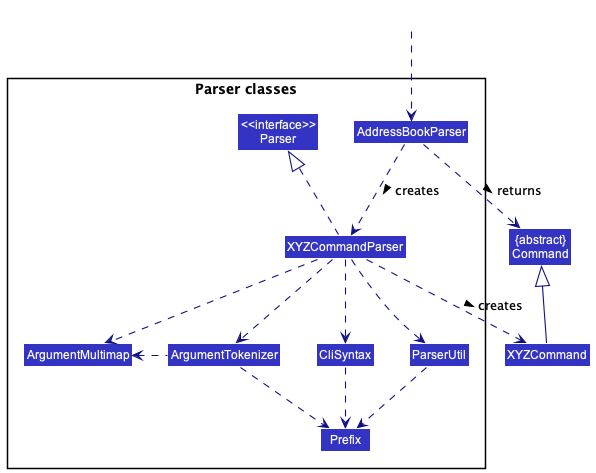
How the parsing works:
- When called upon to parse a user command, the
AddressBookParserclass creates anXYZCommandParser(XYZis a placeholder for the specific command name e.g.,AddCommandParser) which uses the other classes shown above to parse the user command and create aXYZCommandobject (e.g.,AddCommand) which theAddressBookParserreturns back as aCommandobject. - All
XYZCommandParserclasses (e.g.,AddCommandParser,DeleteCommandParser, …) inherit from theParserinterface so that they can be treated similarly where possible e.g, during testing.
Tasks
Commands for tasks (e.g., AddTaskCommand, MarkTaskCommand, …) follow a similar sequence of interactions within
the Logic component as the other commands described above.
However, during execution, tasks commands may update the context of the current tasks of a team. To understand tasks better, it should be understood that Tasks are an attribute of a Teams object, which is used to indicate if a tasks is done (also known as marked), or not (also known as unmarked). Moreover, progress of each task can be tracked with specific levels (namely 25%, 50%, 75% and 100 %).
Below is the class diagram that illustrates the interactions between Logic and Model components, in relation to tasks.
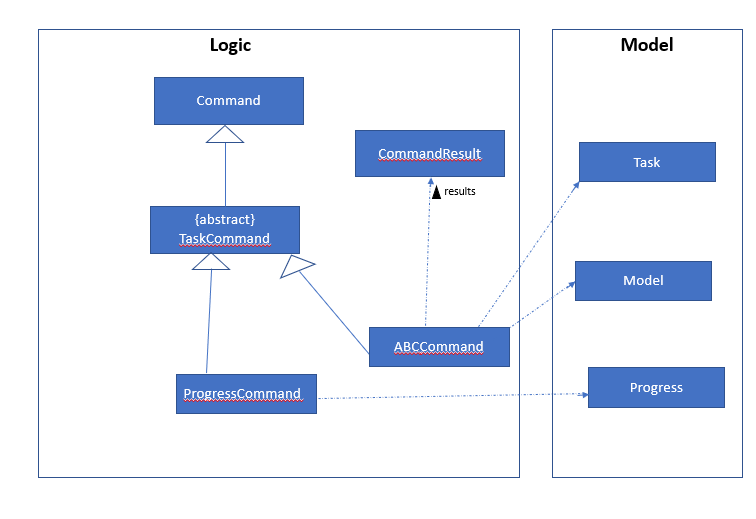
This way of implementation of maintains abstraction of details of the Logic component, in the Model component.
Model component
API : Model.java
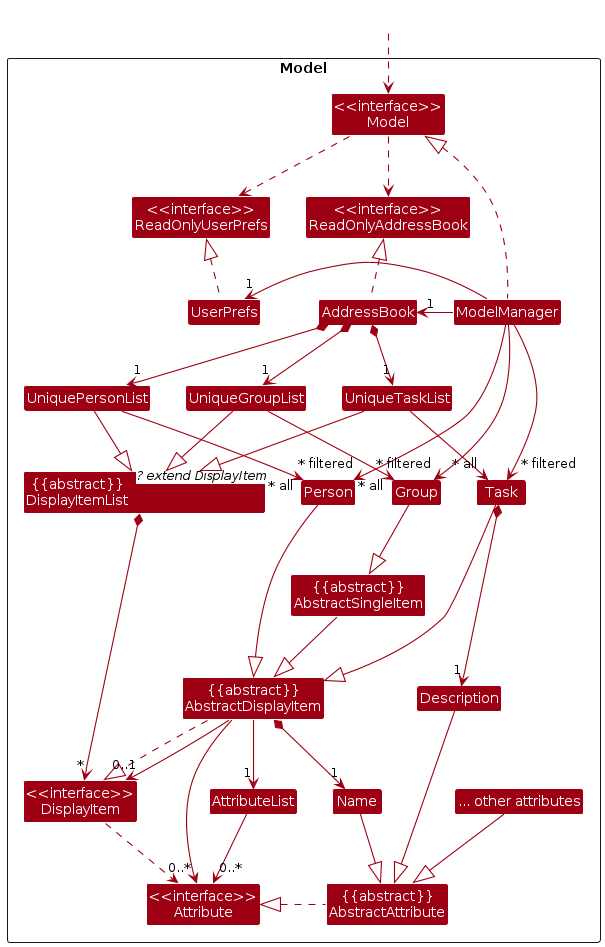
The Model component,
- stores the address book data i.e., all
Person,Task,Groupobjects which are contained in their respective Unique List object (inherited fromDisplayItemList). - stores the currently ‘selected’
Person,Task,Groupobjects (e.g., results of a search query or a change in group context) as a separate filtered list which is exposed to outsiders as an unmodifiableObservableList<T>that can be ‘observed’ e.g. the UI can be bound to this list so that the UI automatically updates when the data in the list change. - stores a
UserPrefobject that represents the user’s preferences. This is exposed to the outside as aReadOnlyUserPrefobjects. - does not depend on any of the other three components (as the
Modelrepresents data entities of the domain, they should make sense on their own without depending on other components)
Additional Attributes are stored within DisplayItem (AbstractDisplayItem, AbstractContainerItem).
Storage component
API : Storage.java
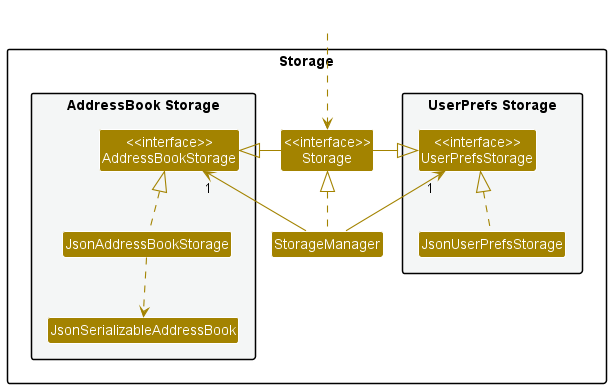
The Storage component:
- Can save both
AddressBookdata and user preference data in json format, and read them back into corresponding objects. - Inherits from both
AddressBookStorageandUserPrefStorage, which means it can be treated as either one (if only the functionality of only one is needed). - Depends on some classes in the
Modelcomponent (because theStoragecomponent’s job is to save/retrieve objects that belong to theModel).
Storage of different classes from the Model component
To store the different classes from the Model component, different Json adapted classes (e.g. JsonAdaptedPerson,
JsonAdaptedGroup, …) will be used to format, store and retrieve from Json files. These classes can then be
converted back into its Model based counterpart easily.
For example, JsonAdaptedPerson can be converted back into a Person class.
Here are the other classes in the Storage component used to store the Model component classes. The class
structure follows closely to the class structure within the Model component:
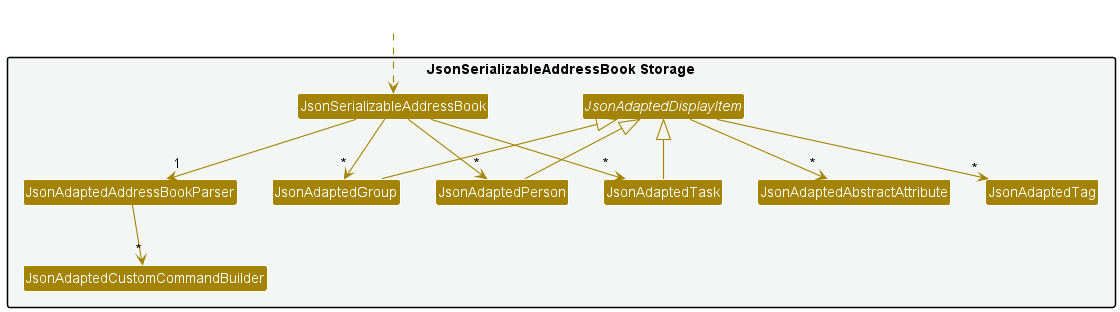
These Json adapted classes are able to convert any String
representation of attributes within the Json files to its proper class attributes using the toModelType method.
![]() Note: Due to the nature of
Note: Due to the nature of AddressBookParser being a singleton class, the toModelType method
in JsonAdaptedAddressBookParser is the only instance where its return type is void.
The Sequence Diagram below illustrates how the Json file is converted back into an AddressBook.
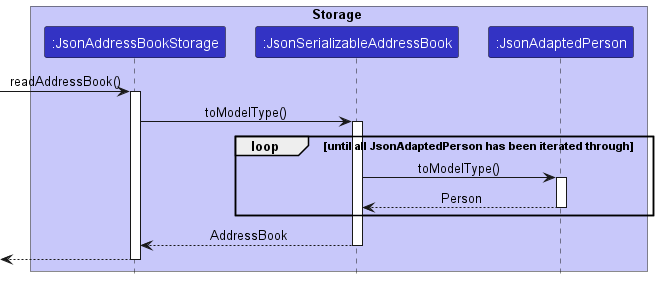
Removing and adding parents to each group, person and task
-
Note that in
JsonSerializableAddressBook, the parenting is extracted and stored as an additional attribute calleditemRelationship. This attribute is a mapping from theuuidof aperson,grouportaskto theuuidsof its respective parents. -
When
Person,GroupandTaskare converted into theirJsonAdaptedclasses to be formatted correctly inAddressBook.json, they will still hold on and store their respectiveuuids. -
When building the
AddressBookinJsonSerializableAddressBook, allpersons,groupsandtasksare built usingtoModelTypewithout their parents. -
Within the
toModelTypemethod inJsonSerializableAddressBook, parents will then be added using thesetParentmethod in eachperson,groupandtaskclass. -
The
AddressBookwith a completed tree-like structure consisting ofpersons,groupsandtasksis returned from thetoModelTypemethod inJsonSerializableAddressBook.
Common classes
Classes used by multiple components are in the seedu.addressbook.commons package.
Implementation
This section describes some noteworthy details on how certain features are implemented.
Attributes Feature
Implementation
The attributes mechanism is facilitated by the creation of a new Attribute instance that is stored within the
AttributesList object that each Person, Group and Task have, as these three classes extend
AbstractDisplayItem, both directly and indirectly.
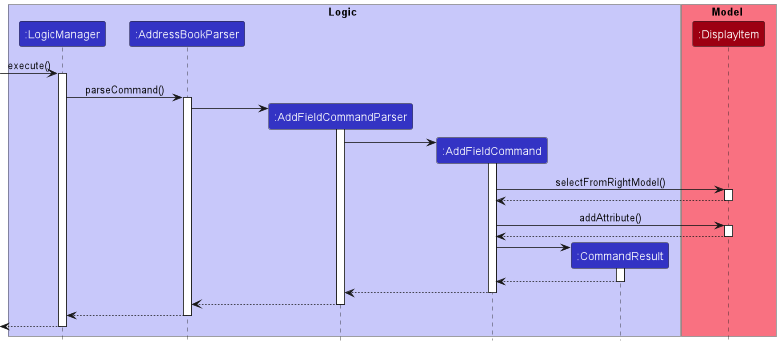
To add a custom attribute, the user should provide an attribute name and an attribute value. These arguments are parsed
by the AddFieldCommandParser, and then matched with the known attributes in the AttributeList.
The process of parsing an Attribute is also done by ParserUtil::parseAttribute, which triages the attribute name
if the attribute is considered as the default attributes (i.e. Name, Email, Phone, Address, Description) and
returns a new instance of that default attribute. If the attribute does not fall within the default attributes, then
it will create a new anonymous class that extends AbstractAttribute.
The following sequence diagram shows how the add attribute operation works:
Design Considerations
-
Alternative 1 (current choice): Stores each
Attributein anAttributeListwithin eachAbstractDisplayIteminstance (e.g.Person,Task,Group).- Pros: Adheres to object-oriented principles, allows storing of non-string attributes.
- Cons: Might be more time expensive to check if attribute names are existing, as
equalsmethod to find matches.
-
Alternative 2: Stores each
Attributein aAttributesobject within eachAbstractDisplayItem, with a class to store aPrefixand theAttributeName- Pros: Adheres to object-oriented principles, more efficient to search for existing attributes with the
implementation of
HashMapfor constant-time searching - Cons: Needs an additional class
AttributePrefixesto store the knownPrefixobjects that was added by the user.
- Pros: Adheres to object-oriented principles, more efficient to search for existing attributes with the
implementation of
-
Alternative 3: Stores all known
Attributeinstances in a separate static class.- Pros: All
Attribute-related operations are stored within one accessible component - Cons: Might violate composition and encapsulation relationships in the object-oriented design.
- Pros: All
[Proposed] Detailed view page feature
As we have already implemented the code to dynamically generate CSS for each individual attribute, we can fully implement detailed view page in the following 3 changes.
- Adds a detailed view page that model/UI can toggle to
- Extends the
field addcommand to allow users to set custom styles and display settings based on the binary bit flags. - Load the attribute in a similar way as to how the card is being generated in the detailed page.
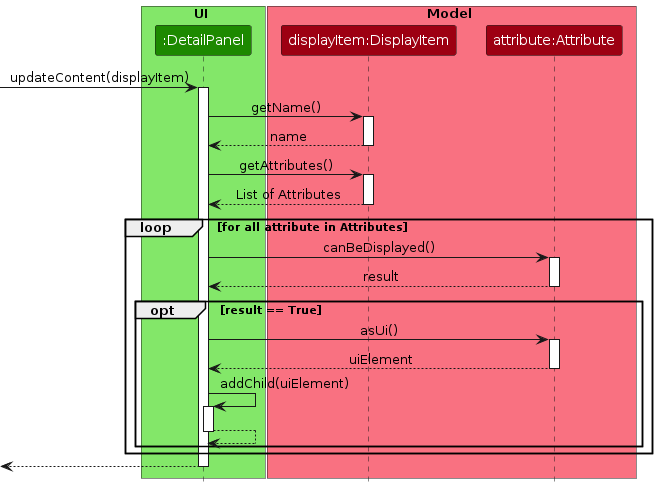
How DetailPanel displays all the details of a DisplayItem as an UI page.
-
UpdateContent(DisplayItem item)will be called when the content of the UI needs to be updated. - The current content will be cleared.
- Similar to how the card is generated by above, DetailPanel will iterate through all displayable Attributes and generate the corresponding UI components to be added to the details page.
- The DetailPanel is now updated with the details of the new DisplayItem.
Below shows a sequence diagram of how DetailPanel page is filled with contents of a DisplayItem.
The proposed detailed view page allows users to have a more detailed analysis of each of the Display Items in address book and allows the user to view hidden detailed hid in list view from the display view list using the bit corresponding MENU_OK found in AccessDisplayFlag.java
[Proposed] Undo/redo feature
Proposed Implementation
The proposed undo/redo mechanism is facilitated by VersionedAddressBook. It extends AddressBook with an undo/redo history, stored internally as an addressBookStateList and currentStatePointer. Additionally, it implements the following operations:
-
VersionedAddressBook#commit()— Saves the current address book state in its history. -
VersionedAddressBook#undo()— Restores the previous address book state from its history. -
VersionedAddressBook#redo()— Restores a previously undone address book state from its history.
These operations are exposed in the Model interface as Model#commitAddressBook(), Model#undoAddressBook() and Model#redoAddressBook() respectively.
Given below is an example usage scenario and how the undo/redo mechanism behaves at each step.
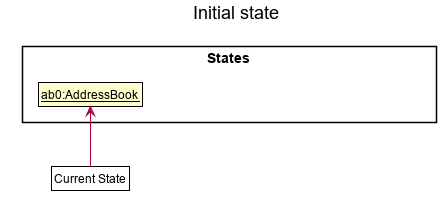
Step 1. The user launches the application for the first time. The VersionedAddressBook will be initialized with the initial address book state, and the currentStatePointer pointing to that single address book state.
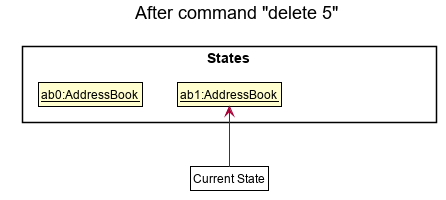
Step 2. The user executes delete 5 command to delete the 5th person in the address book. The delete command calls Model#commitAddressBook(), causing the modified state of the address book after the delete 5 command executes to be saved in the addressBookStateList, and the currentStatePointer is shifted to the newly inserted address book state.
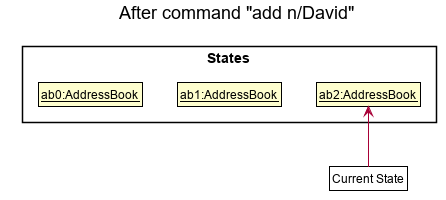
Step 3. The user executes add n/David … to add a new person. The add command also calls Model#commitAddressBook(), causing another modified address book state to be saved into the addressBookStateList.
Model#commitAddressBook(), so the address book state will not be saved into the addressBookStateList.
Step 4. The user now decides that adding the person was a mistake, and decides to undo that action by executing the undo command. The undo command will call Model#undoAddressBook(), which will shift the currentStatePointer once to the left, pointing it to the previous address book state, and restores the address book to that state.
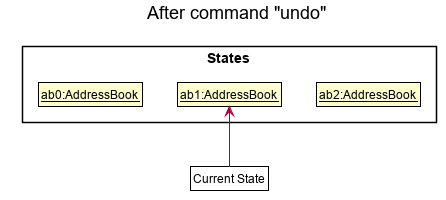
currentStatePointer is at index 0, pointing to the initial AddressBook state, then there are no previous AddressBook states to restore. The undo command uses Model#canUndoAddressBook() to check if this is the case. If so, it will return an error to the user rather
than attempting to perform the undo.
The following sequence diagram shows how the undo operation works:
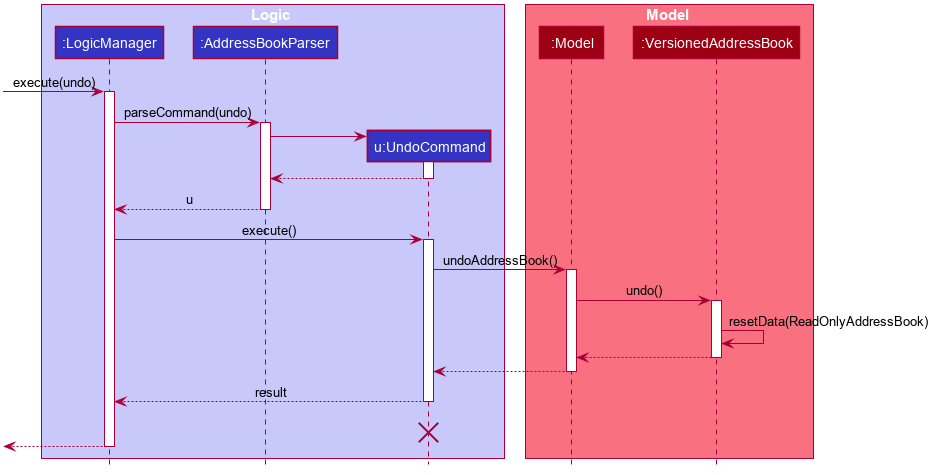
UndoCommand should end at the destroy marker (X) but due to a limitation of PlantUML, the lifeline reaches the end of diagram.
The redo command does the opposite — it calls Model#redoAddressBook(), which shifts the currentStatePointer once to the right, pointing to the previously undone state, and restores the address book to that state.
currentStatePointer is at index addressBookStateList.size() - 1, pointing to the latest address book state, then there are no undone AddressBook states to restore. The redo command uses Model#canRedoAddressBook() to check if this is the case. If so, it will return an error to the user rather than attempting to perform the redo.
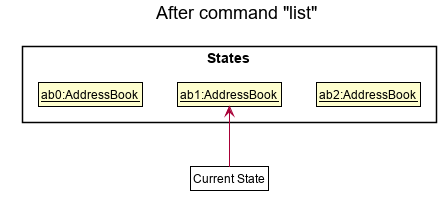
Step 5. The user then decides to execute the command list. Commands that do not modify the address book, such as list, will usually not call Model#commitAddressBook(), Model#undoAddressBook() or Model#redoAddressBook(). Thus, the addressBookStateList remains unchanged.
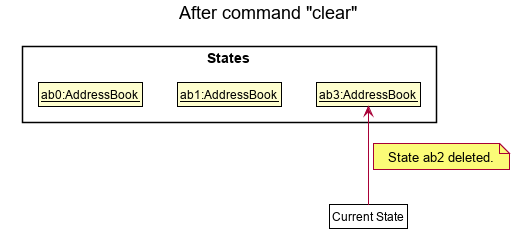
Step 6. The user executes clear, which calls Model#commitAddressBook(). Since the currentStatePointer is not pointing at the end of the addressBookStateList, all address book states after the currentStatePointer will be purged. Reason: It no longer makes sense to redo the add n/David … command. This is the behavior that most modern desktop applications follow.
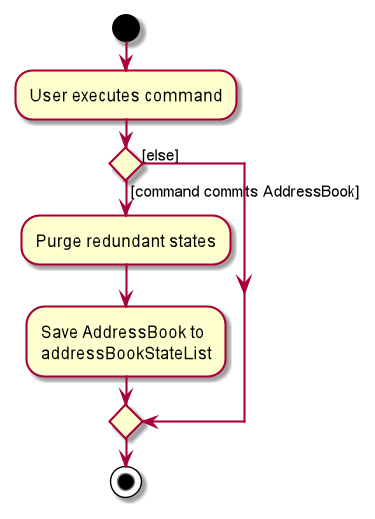
The following activity diagram summarizes what happens when a user executes a new command:
Design considerations:
Aspect: How undo & redo executes:
-
Alternative 1 (current choice): Saves the entire address book.
- Pros: Easy to implement.
- Cons: May have performance issues in terms of memory usage.
-
Alternative 2: Individual command knows how to undo/redo by itself.
- Pros: Will use less memory (e.g. for
delete, just save the person being deleted). - Cons: We must ensure that the implementation of each individual command are correct.
- Pros: Will use less memory (e.g. for
{more aspects and alternatives to be added}
[Proposed] Data archiving
{Explain here how the data archiving feature will be implemented}
Documentation, logging, testing, configuration, dev-ops
Appendix: Requirements
Product scope
Target user profile:
- They are tech-savvy
- Organised and consistent in using the app
- Have a need to effectively manage their team, through work progress and employee involvement
- Doesn’t mind putting extra time to make their life easier in the future
Value proposition:
- Manage employees
- Manage multiple projects and their progress + contributions from employees
- More effective under the hand of a tech-savvy user
- Meeting/time management
- Easily personalizable
User stories
Priorities: High (must have) - * * *, Medium (nice to have) - * *, Low (unlikely to have) - *
| Priority | As a … | I want to … | So that I can… |
|---|---|---|---|
* * * |
basic user | add new contacts | add new contacts for use later |
* * * |
basic user | delete contacts | remove old unused contacts |
* * * |
basic user | view my current contacts | see all the contacts I have saved |
* * * |
basic user | group contacts into group | categorise my contacts |
* * * |
basic user | add additional info for each contact via a custom field | record extra information that i need to take note of regarding the contact |
* |
regular user | customise the colors of the user interface to my liking | be more comfortable using the app |
* * |
regular user | add custom commands acting as macros to the app | be more efficient with controls specific to my use. |
* * |
user | export my contacts as to csv or vcard | transfer general contact information to be used elsewhere or for sharing. |
* * |
user | add aliases to my contacts | search the contacts up faster |
* * * |
user | edit group information and group user information | edit and update team information should such details change |
* * * |
user | have an advertisement free experience | be more focused and not get distracted by ads |
* * |
user | transfer app data | keep my current data should i change devices or have multiple devices using the app |
* * * |
user | edit contact information | update my contacts with the most recent update |
* * |
user | have an responsive and snappy user experience | have a more enjoyable experience while using the app as well as increased efficiency |
* * |
user | undo a command | easily revert incorrect changes |
* * |
user | automatically save the data | be assured that i won’t lose data in the event the app exits improperly due to rare circumstances (e.g. computer crash) |
* * |
user | enjoy a simple and accessible user interface | easily understand and use the basic features without the need to extensively refer to a user guide |
* * |
user | enjoy a clean and zen-style gui | be more focused and not easily distracted. |
* * * |
developer | use the app solely using the keyboard (cli like input controls) | be fast and efficient since pressing a key is faster than reaching for the mouse |
* |
busy, working adult | have a clear separation between work contacts and other contacts | have a clear work-life balance |
* * * |
project manager | add extra information to each group of contacts | keep extra information regarding my team |
* * * |
project manager | add task to a group | record tasks to be done by my team |
* * * |
project manager | assign specific task to single or multiple users within a group | delegate tasks assignment when working in a team |
* * |
project manager | view the timeline of task completion within a group | track progress within the group |
* * * |
project manager | add additional information to a contact within a team | track bonus details and information regarding a member |
* * * |
project manager | add completion dates to some tasks assigned in the group | set deadlines to group specific tasks |
* * * |
project manager | add ability to add custom fields when adding contacts to a group | tailor fit the group to my project needs |
* |
project manager | add custom color palette to each group | feel more personalised to each team as well as better differentiate between different teams |
* * * |
project manager | change the completion status of tasks in a group | to indicate the if an assigned task has been completed by a member |
* * |
project manager | generate a progress report of the group progress (i.e. show task done at what time, how many percent done etc) | easily access and present those information to others (e.g. higher ups) as well as tracking the progress of the project. |
* * * |
project manager | have the ability to broadcast messages to my team members | disseminate information in a short time. |
* * * |
project manager | delegate work to each group efficiently via commands | cut down on time spent doing admin work |
* * * |
project manager | access and view the contacts of my team members | track progress of the team on an individual level |
* * |
project manager | organise my project team tasks with efficiency | spend less time doing admin work |
* * |
project manager | switch context easily between multiple groups | manage multiple teams |
* * * |
project manager | issue commands specific to the team | be more efficient and type fewer group related details |
Use cases
(For all use cases below, the System is Contactmation and the Actor is the user, unless specified otherwise)
Use case: UC01 - Delete a person
MSS
- User requests to list persons.
- Contactmation shows a list of persons.
- User requests to delete a specific person in the list.
-
Contactmation deletes the person.
Use case ends.
Extensions
-
2a. The list is empty.
Use case ends.
-
3a. The given index is invalid.
-
3a1. Contactmation shows an error message.
Use case resumes at step 2.
-
Use case: UC02 - Edit a person
MSS
- User requests to list persons.
- Contactmation shows a list of persons.
- User requests to edit a specific person in the list.
- Contactmation shows a screen with the properties of the person.
- User edits the properties to their liking and saves.
-
Contactmation saves the data.
Use case ends.
Extensions
-
2a. The list is empty.
Use case ends.
-
3a. The given index is invalid.
-
3a1. Contactmation shows an error message.
Use case resumes at step 2.
-
Use case: UC03 - Create a team
MSS
- User requests to create a team with a team name.
-
Contactmation creates the team.
Use case ends.
Extensions
-
1a. The team name is empty or invalid.
-
1a1. Contactmation shows an error message.
Use case ends.
-
-
2a. The new team is in the current path.
-
2a1. Contactmation adds the new team to the list of teams in this path.
Use case ends.
-
Use case: UC04 - Enter a team context
MSS
- Contactmation shows a list of teams.
- User requests to enter a team context.
- Contactmation enters the team context.
-
Contactmation only shows information specified to the new team context.
Use case ends.
Extensions
-
2a. The team selected is invalid.
-
2a1. Contactmation shows an error message.
Use case ends.
-
Use case: UC05 - Add a Task
MSS
- User requests to list groups.
- Contactmation shows a list of groups.
- User requests to add a task to a group in the list.
-
Contactmation adds the task.
Use case ends.
Extensions
-
2a. The list is empty.
Use case ends.
-
3a. The given index is invalid.
-
3a1. Contactmation shows an error message.
Use case resumes at step 2.
-
Use case: UC06 - Set a Task completion status
MSS
- User requests to list tasks for a group.
- Contactmation shows a list of tasks.
- User requests to set the task completion status.
-
Contactmation sets the task completion status.
Use case ends.
Extensions
-
2a. The list is empty.
Use case ends.
-
3a. The given index is invalid.
-
3a1. Contactmation shows an error message.
Use case resumes at step 2.
-
-
4a. The given status is empty.
-
4a1. Contactmation sets the task to
DoneUse case ends.
-
Use case: UC07 - Create a macro
MSS
- User enters the command to create a macro.
-
Contactmation creates and saves the macro.
Use case ends.
Extensions
-
1a. The macro command is invalid.
-
1a1. Contactmation shows an error message.
Use case ends.
-
Use case: UC08 - Execute a macro
MSS
- User requests to use a macro.
-
Contactmation executes the commands defined by the macro.
Use case ends.
Extensions
-
1a. The macro does not exist.
-
2a1. Contactmation shows an error message.
Use case ends.
-
Use case: UC09 - Execute a foreach loop
MSS
- User requests to use a with a supplied command over selected item type.
-
Contactmation executes the command over the selected item type.
Use case ends.
Extensions
-
1a. The command is invalid.
-
1a1. Contactmation shows an error message.
Use case ends.
-
-
1b. The selected item type does not exist.
-
1b1. Contactmation shows an error message.
Use case ends.
-
-
2a. The command fails on an item.
- 2a1. Contactmation stops execution of the loop.
-
2a2. Contactmation displays an error message
Use case ends.
Use case: UC10 - Use macros for repetitive tasks
MSS
- User creates a macro (UC07).
-
User executes a foreach loop (UC09) with the macro.
Use case ends.
Extensions
-
2a. The macro does not exist.
-
2a1. Contactmation shows an error message.
Use case ends.
-
Non-Functional Requirements
- Should work on any mainstream OS as long as it has Java
11or above installed. - Should be able to hold up to 1000 persons without a noticeable sluggishness in performance for typical usage.
- A user with above average typing speed for regular English text (i.e. not code, not system admin commands) should be able to accomplish most of the tasks faster using commands than using the mouse.
- Should be usable with only a command-line interface.
- Data should persist between app launches.
- Should work with both 32-bit and 64-bit operating systems.
- The system is not required to do any communication with the Internet (e.g. sending emails).
- Should not use any images or terms that could be deemed as offensive.
Glossary
- Mainstream OS: Windows, Linux, Unix-like, MacOS
- Command-line Interface: A system that received user input in the form of lines of text
- Task: A piece of work that has to be done, that can be assigned to people and that may have a deadline
Appendix: Instructions for manual testing
Given below are instructions to test the app manually.
Launch and shutdown
-
Initial launch
-
Download the
contactmation.jarfile and copy into an empty folder -
Double-click the jar file
Expected: Shows the GUI with a set of sample contacts. The window size may not be optimum.
-
-
Clearing the default sample contacts
- Run the
clearcommand to remove existing data from the application.
Expected: Removes existing sample contacts, groups and/or tasks from the application.
- Run the
Adding a person
- Adding a person to the application
- Test Case:
person new n/John Doe
Expected: Contact with name John Doe is created with index number 1. - Test Case:
person new n/Caroline Smith p/86178049 e/caroline@gmail.com t/friendExpected: Contact with name Caroline Smith is created with index number 2. Phone, Email and tag is present in the GUI.
- Test Case:
Deleting a person
-
Deleting a person while all persons are being shown
-
Prerequisites: List all persons using the
listcommand. Multiple persons in the list. -
Test case:
delete 1
Expected: First contact is deleted from the list. Details of the deleted contact shown in the status message. Timestamp in the status bar is updated. -
Test case:
delete 0
Expected: No person is deleted. Error details shown in the status message. Status bar remains the same. -
Other incorrect delete commands to try:
delete,delete x,...(where x is larger than the list size)
Expected: Similar to previous.
-
-
{ more test cases … }
Group Commands
- Creating a group from the main window
- Test case:
team new cs2103
Expected: A team with name/cs2103will appear in the left pane of the GUI.
- Test case:
- Navigating to a Group
- Prerequisite: At least one team should be present in the GUI
- Test case:
cg 1
Expected: GUI should now be in the scope of the first team in the list of teams. If the first team is/cs2103, you can expect to see a/cs2103on the bottom left of the GUI.
- Add a person in the group
- Prerequisite: You should now have navigated inside a group.
- Test case:
person new n/Eric
Expected: A person namedEricshould now be created inside the group.
- Navigate back to the root group:
- Prerequisite: You should now have navigated inside a group.
- Test case:
cg /
Expected: You should now be navigated back to the root group (the window that you first see when you start the app).
Task Commands
- Creating a task from a group
- Prerequisite: You should have at least one group, and you should now have navigated into a group.
- Test case:
task add t/Todo d/Finish Work
Expected: A task named todo with description finish work should be visible in the right pane of the GUI.
- Mark a task as done
- Prerequisite: You should have at least one task visible in the current state of the GUI.
- Test case:
task mark 1Expected: The task in the index 1 should now be marked as completed.
- Mark a task as not done
- Prerequisite: You should have at least one task visible in the current state of the GUI, and the task should have been marked as done.
- Test case:
task unmark 1Expected: The task in the index 1 should now be marked as incomplete.
- Delete a task from the list of tasks
- Prerequisite: You should have at least one task visible in the current state of the GUI.
- Test case:
task delete 1Expected: The task in the index 1 should now be removed from the application, and should not be removed from the GUI.
Attribute Commands
- Create a new Attribute for a Person
- Prerequisite: You should have at least one person present in the GUI
- Test Case:
field add u/1 github johndoe123
Expected: The attribute “github: johndoe123” should be visible in the GUI
- Remove an attribute for a person
- Prerequisite: You should have at least one person present in the GUI, the person should have an attribute
- Test case:
field delete u/1 github
Expected: The attribute “github: johndoe123” from the previous example should not be visible in GUI.